


16 Brocade SMI Agent User’s Guide
53-1001778-01
Proxy connections
3
Proxy connections
The SMI-A installation wizard automatically configures the provider.xml file with the fabric
information that is added during the installation process. This section describes how you can add
or remove proxy entries manually after installation is done.
You can also choose to have the SMI-A attempt to reload the provider.xml when fabric
segmentation occurs.
When you add proxy entries, the SMI-A attempts to log in to every one. If you have proxy entries for
different switches in the same fabric, the SMI-A establishes only one connection to the fabric, using
the first valid switch in the list. Subsequent login attempts to the same fabric result in an
informative error message: “A duplicate switch in the fabric has been identified and will be
removed.”
By default, passwords are stored in encrypted format in the provider.xml file. Duplicate proxy IP
addresses are not allowed.
The provider.xml file is located in the <SMIAgent>\agent\server\jserver\bin directory.
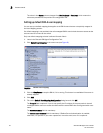
Reloading provider.xml on fabric segmentation
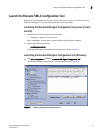
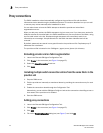
1. Launch the Brocade SMI Agent Configuration Tool.
2. Click Proxies in the menu tree (see Figure 4 on page 15).
3. Select the ReloadConnection check box.
4. Click Apply.
Including multiple switch connection entries from the same fabric in the
provider.xml
1. Stop the SMIA server.
2. Edit the provider.xml manually as mentioned above by providing the connection entry for each
switch.
3. Enable the connection reload through the Configuration Tool.
Alternatively, you can edit the SMIAgentConfig.xml and set the connection reload flag to true so
that rescan of the provider.xml is enabled.
4. Start the SMIA server.
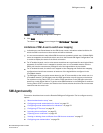
Adding proxy connections
1. Launch the Brocade SMI Agent Configuration Tool.
2. Click Proxies in the menu tree (see Figure 4 on page 15).
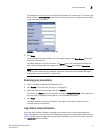
3. Click Add.
4. Fill out the Proxy Configuration dialog box (see Figure 5) and click OK.