E-14
• At this point, the label printer returns to the text input
screen.
To change the text effect for a range of text
1. After performing the two steps under “To assign text ef-
fects”, use u and i to highlight “TEXT” and then press
SET.
2. Move the cursor to the start character from which you
want to change the text effect and then press SET to
register your selection.
3. Move the cursor to the end character up to which you
want to change the text effect and then press SET to
register your selection and change the text effect.
• At this point, the label printer returns to the text input
screen.
Part 6 Character Sizes
Your label printer comes with two basic typefaces: standard
and small. You can adjust the size of characters either by
direct specifying for each character or specifying character
size for entire lines of text using preset formats.
The operations in this part of the manual explain how to
change character sizes using each of these techniques.
Direct Specification of Character Sizes
You can specify the size of characters using the numeric
factors shown in the tables below. A character size change
is indicated on the display by a character size indicator.
Standard Typeface
• The normal size for the standard typeface is 1 × 1 (24 ×
24 dots; 3mm × 3mm).
• Character size can be changed by specifying a vertical
factor (1, 2, 3, 4, 5) and a horizontal factor (1, 2, 3, 4, 5, 6,
7).
• The table below shows the character size indicator val-
ues that appear for each character size.
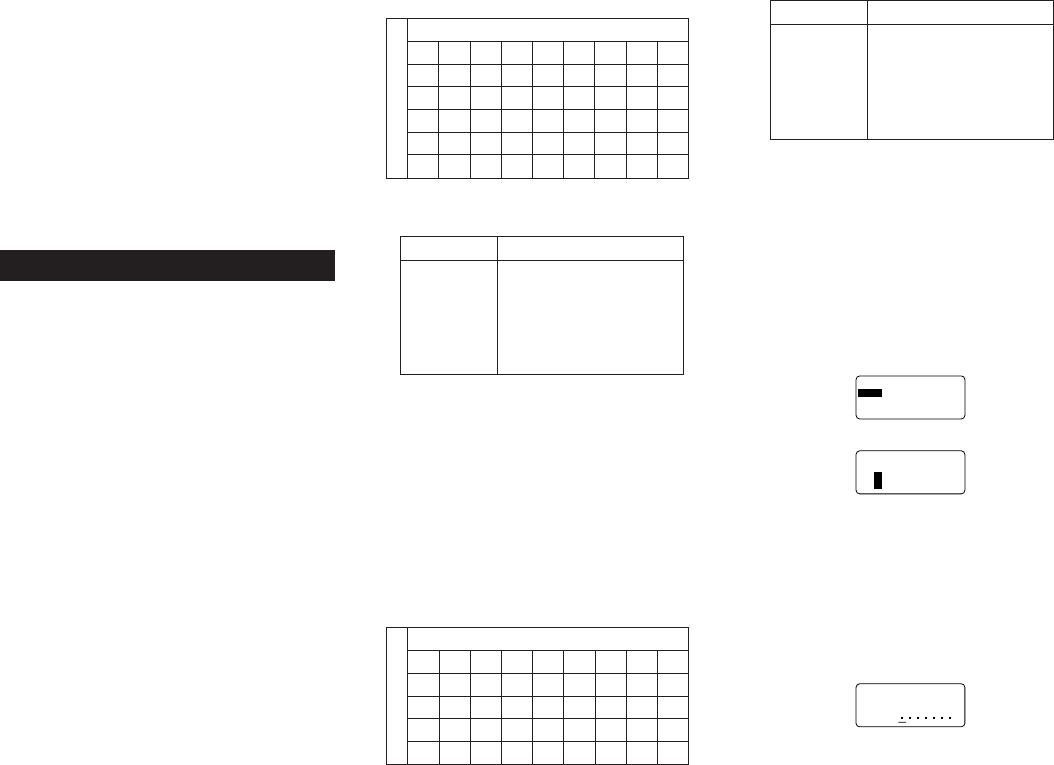
■ Standard Typeface
Important! The vertical character sizes you can use are
automatically limited by the width of the tape loaded in the
label printer.
• The range (From - To settings) for a character size speci-
fication cannot extend from one block to another.
Small Typeface
• The normal size for the small typeface is 1 × 1 (16 × 16
dots; 2mm × 2mm). 8 × 16 dots matrix is used to form
alpha-numeric characters and symbols.
• Character size can be changed by specifying a vertical
factor (1, 2, 3, 4) and a horizontal factor (1, 2, 3, 4, 5, 6, 7,
8).
• The table below shows the character size indicator val-
ues that appear for each character size.
• The character size indicator 1 × 1 is shown on the display
when the small typeface is being used.
■ Small Typeface
Tape Width VerticaI Character Sizes
6mm 1
9mm 1, 2
12mm 1, 2, 3
18mm 1, 2, 3, 4, 5
24mm 1, 2, 3, 4, 5
Horizontal
Vertical
Factor
12345678
11 × 11 × 21 × 31 × 41 × 51 × 61 × 71 × 8
22 × 12 × 22 × 32 × 42 × 52 × 62 × 72 × 8
33 × 13 × 23 × 33 × 43 × 53 × 63 × 73 × 8
44 × 14 × 24 × 34 × 44 × 54 × 64 × 74 × 8
Tape Width VerticaI Character Sizes
6mm 1
9mm 1, 2
12mm 1, 2, 3
18mm 1, 2, 3, 4
24mm 1, 2, 3, 4
Horizontal
Vertical
Factor
12345678
11 × 11 × 21 × 31 × 41 × 51 × 61 × 71 × 8
22 × 12 × 22 × 32 × 42 × 52 × 62 × 72 × 8
33 × 13 × 23 × 33 × 43 × 53 × 63 × 73 × 8
44 × 14 × 24 × 34 × 44 × 54 × 64 × 74 × 8
55 × 15 × 25 × 35 × 45 × 55 × 65 × 75 × 8
• The range (From - To settings) for a character size speci-
fication cannot extend from one block to another.
Notes
• Proportional spacing cannot be used with the small
typeface.
• Available font is only one.
• Style and text effect settings may not print correctly when
used with the small typeface.
• Dingbats and user characters may not print correctly when
used with small typeface.
To change character size using direct
specification
1. While there is text on the display, press SIZE.
–––––
EZIS
–––––
EZIS
TA
M
R
O
F
2. Use u and i to highlight “SIZE” and then press SET.
–––––
EZIS
–––––
H
T
D
I
W
T
H
G
IE
H
4 × 4
3. Specify the character size you want.
• Use t and y to move the highlighting between the two
dimensions.
• To change a dimension, press i to increase it or u to
decrease it. Or you can input a value directly on the label
printer’s keyboard.
• Remember that the dimensions you can specify depend
on the width of the tape loaded in the label printer (see
table, left).
4. After you finish setting the character size you want, press
SET to register it.
5
4
321
–––––
EZIS
–––––
?
M
O
R
F


