


6 Cisco 12012 Gigabit Switch Router Card Cage Assembly Replacement Instructions
Tools and Parts Required
Preventing Electrostatic Discharge Damage
Electrostatic discharge damage, which can occur when electronic boards or components are handled
improperly, can result in complete or intermittent failures.
Following are guidelines for preventing ESD damage:
• Always use an ESD-preventive wrist strap or ankle strap and ensure that it makes good skin
contact.
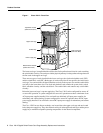
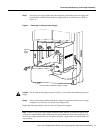
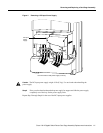
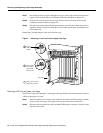
• When removing or installing a component, connect the equipment end of a ground strap to one
of the two ESD ground sockets located on the front sides of the upper card cage or to a bare metal
surface on the frame.
• If you plan to return a replaced component to the factory, immediately place it in a static shielding
bag to avoid ESD damage to the component.
• The wrist strap only protects the component from ESD voltages on the body; ESD voltages on
clothing can still cause damage.
Caution You should periodically check the resistance value of the antistatic strap. The
measurement should be between 1 and 10 megohms.
Tools and Parts Required
You need the following tools and parts to remove and replace the card cage assembly:
• ESD-preventive wrist strap
• 1/4-inch flat-blade screwdriver
• 3/16-inch flat-blade screwdriver
• 10-mm nutdriver
• Antistatic mat
• The replacement card cage assembly (Product Number: GSR12-CARDCAGE=)
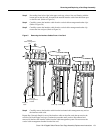
You must remove all cards and power supplies from the old card cage assembly and install them in
the replacement card cage assembly. The replacement card cage ships with a new air filter installed.