


2-10
Cisco Aironet 1000 Series Lightweight Access Point Hardware Installation Guide
OL-9403-04
Chapter 2 Installing the Access Point
Mounting Overview
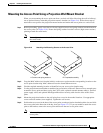
Mounting Access Points Using a Ceiling-Mount Base
When you are mounting the access point to horizontal surface, such as the ceiling of a building, use the
ceiling-mount base to mount the access point. The ceiling-mount base can also be used to mount the
access point to a desktop or shelf.
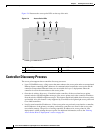
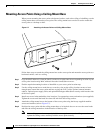
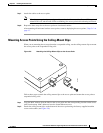
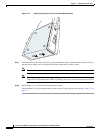
Figure 2-7 Attaching the Access Point and Ceiling-Mount Base
Follow these steps to attach the ceiling-mount base to the access point and mount the access point to a
horizontal surface, such as a ceiling.
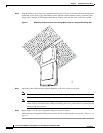
Step 1 Copy the MAC address(es) from the label(s) on the access point onto the corresponding location on your
access point location map. MAC addresses have the format 00xxxxxxxxxx.
Step 2 Find the required mounting location as identified on your access point location map.
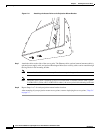
Step 3 Use the ceiling-mount base to mark the two screw key slots on the ceiling location. ensure to leave
enough space around the access point and base to plug the CAT-5 cable, optional external antenna
cable(s), optional power supply cable, and optional Kensington MicroSaver security cable into the sides
of the access point.
Step 4 Install two screws in the marked key slots locations. Use appropriate screws and anchors (user supplied).
Tighten the screws until the heads are about 1/8 inch from the ceiling surface.
Step 5 Attach the ceiling-mount base to the bottom of the access point using the factory-supplied machine
screws and washers (refer to Figure 2-7).
Step 6 Position the access point with the ceiling-mount base so its keyhole slots are on over the screw heads
and slide the ceiling-mount base in the direction of the key slots.
Note If the ceiling screws do not securely hold the access point, remove the ceiling-mount base and
tighten the ceiling screws until they hold the access point securely.
135664