


2-13
Cisco Aironet 1000 Series Lightweight Access Point Hardware Installation Guide
OL-9403-04
Chapter 2 Installing the Access Point
Mounting Overview
Mounting the Access Point Using a Projection Wall Mount Bracket
When you are mounting the access point out from a vertical wall (flat sides along the wall or hallway),
use an optional factory-orderable projection-mount L-bracket (see Figure 2-6). Follow these steps to
attach the access point to the projection-mount bracket and mount the access point to a vertical wall:
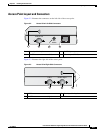
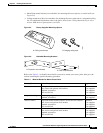
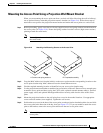
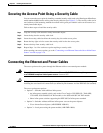
Step 1 Before proceeding, gently screw the two factory-supplied screws and spring washers into the bottom of
the access point (see Figure 2-10). Ensure the spring washers have their convex (high center sections)
pointing toward the screw heads.
Note Do not tighten the screw heads flush with the access point surface or the bracket will not fit under
the screw heads.
Figure 2-10 Attaching the Mounting Screws to the Access Point
Step 2
Copy the MAC address(es) from the label(s) on the access point onto the corresponding location on the
access point location map. MAC addresses have the format 00xxxxxxxxxx.
Step 3 Find the required mounting location as identified on your access point location map.
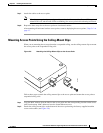
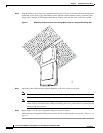
Step 4 Use the projection-mount bracket to mark the four screw holes on the wall. Ensure to leave enough space
around the access point and base to plug the CAT-5 cable, optional external antenna cable(s), optional
power supply cable, and optional Kensington MicroSaver security cable into the sides of the access
point.
Step 5 Mount the projection-bracket to the wall using four screws in the marked locations. Use appropriate
screws and wall anchors (user supplied). Tighten the wall screws.
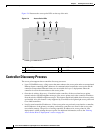
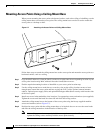
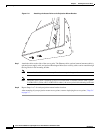
Step 6 Position the two screws in the base of the access point over the projection-bracket keyhole slots and slide
the access point in the direction of the key slots (see Figure 2-11). If you are unable to attach the access
point to the bracket, remove the access point and loosen the two access point screws.
Note After attaching the access point to the bracket, tighten the screws until they securely hold the
access point.
135667
A. Screws and spring washers B. Completed assembly