


Installing Software 2-1
Installing Software
Installing Drivers
and Applications
You need to install device drivers and applications prior to using your Sound Blaster Audigy 2. To install
these drivers and the selected software applications, use the following instructions. The instructions are
applicable to all supported Windows operating systems.
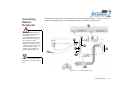
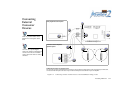
1. After you have installed the Sound Blaster Audigy 2 card and Joystick/MIDI bracket*, turn on your
computer. Windows automatically detects the audio card and device drivers.
2. When prompted for the audio drivers, click the Cancel button.
3. Insert the Sound Blaster Audigy 2 Installation and Applications CD into your CD-ROM drive.
If the drive supports Windows AutoPlay mode, the CD starts running automatically. If not, you need
to enable your CD-ROM drive’s auto-insert notification feature. For more details, see “Problems
Installing Software” on page B-1.
4. Follow the instructions on the screen to complete the installation.
5. When prompted, restart your computer.
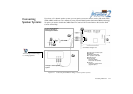
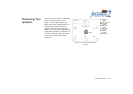
To feel the audio card’s awesome gaming, music reproduction and home studio capabilities, install the
Sound Blaster Audigy 2 Feature Showcase Demo. This demo requires high-quality 5.1/6.1 speaker for
optimal listening experience. See “Sound Blaster Audigy 2 Feature Showcase Demo” on page 2-2.
• During the installation
process, Windows 98 SE
users will be prompted to
insert the Windows 98 SE
installation CD into the CD-
ROM drive. Insert the
installation CD into the CD-
ROM drive and then click the
OK button.
• Some computers may not be
supplied with the Windows
98 SE CD. The necessary
files may be found in
D:\Windows\
Options\Cabs (where D:
represents the drive Windows
has been installed on).
• *Available with some models
of the Sound Blaster Audigy
2 card.