


Installing System Components 69
4
If applicable, disconnect the cables from the SAS RAID controller daughter card or expansion card and
pull the cables out of the way of the center fans. See "Removing the SAS RAID Controller Daughter
Card" on page 93.
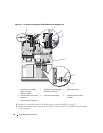
5 Remove the fans from the center fan bracket. See
"Removing and Installing a Fan" on page 53
.
6 Remove the center fan bracket. See
"Removing the Center Fan Bracket" on page 79
.
7
U
npack the tape drive (and controller card, if applicable) and configure the tape drive according to
the documentation that came with the tape drive, based on the following guidelines:
a
Each device attached to a SCSI host adapter must have a unique SCSI ID number. (Narrow SCSI
devices use IDs 0 to 7; wide SCSI devices use IDs from 0 to 15). Set the drive’s SCSI ID to avoid
conflicts with other devices on the SCSI bus. For the default SCSI ID setting, see the
documentation provided with the drive.
NOTE: There is no requirement that SCSI ID numbers be assigned sequentially or that devices be attached to
the cable in order by ID number.
b
SCSI logic requires that the two devices at opposite ends of a SCSI chain be terminated and that
all devices in between be unterminated. Therefore, you enable the tape drive’s termination if it is
the last device in a chain of devices (or sole device) connected to the SCSI controller.
8 If a controller card was included in the drive kit, install the card now. See
"Installing an Expansion
Card" on page 57
.
9
Remove the filler plate from the tape backup unit bay, if applicable:
a
Push the spring latch at the top of the peripheral bay to the right, and pry the top end of the filler
plate away from the system.
b
Draw the filler plate upward and out of the system.
10
If the mounting screws are not attached to the drive, install them now.
11
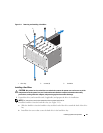
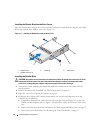
Insert
the new tape drive three-quarters of the way into the drive slot on the peripheral bay
, with the
mounting screws entering the bay slide slots
.
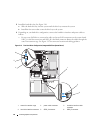
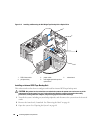
12
Connect the SCSI interface cable in the drive kit to the drive. See Figure 3-15.
13 Replace the center fan bracket. See
"Replacing the Center Fan Bracket" on page 79
.
14
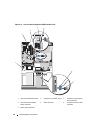
Connect the SCSI interface cable to the SCSI connector on the optional SCSI controller card.
15 Connect the power cable to the power connector on the drive.
16
Push the tape drive the rest of the way into the bay until the spring latch engages.
17
Replace the fans into the center fan bracket. See "Removing and Installing a Fan" on page 53.
18
If applicable, reconnect the cables to the SAS RAID controller daughter card or expansion card. See
"Installing the SAS RAID Controller Daughter Card" on page 95.
19 Close the system. See
"Closing the System" on page 48
.
20 Replace the front bezel, if removed. See "Installing the Bezel" on page 47.
21
Reconnect the system and peripherals to their electrical outlets, and turn them on.