


92 Removing and Installing Parts
CAUTION: A new battery can explode if it is incorrectly installed. Replace the battery only with the
same or equivalent type recommended by the manufacturer. Discard used batteries according to the
manufacturer’s instructions.
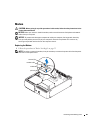
Replacing the Battery
NOTE: For information regarding the type of coin-cell battery, see "Power" on page 98.
1
Record all the screens in system setup (see page 99) so that you can restore the correct
settings in step 9.
2
Follow the procedures in "Before You Begin" on page 55.
3
Remove the computer cover (see page 61).
4
Locate the battery socket (see page 64).
NOTICE: If you pry the battery out of its socket with a blunt object, be careful not to touch the system
board with the object. Ensure that the object is inserted between the battery and the socket before you
attempt to pry out the battery. Otherwise, you may damage the system board by prying off the socket or
by breaking circuit traces on the system board.
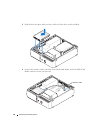
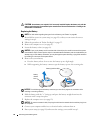
5
Remove the system battery.
a
Press the battery release lever to raise the battery up at a slight angle.
b
While supporting the battery connector, pry the battery up out of its securing tabs.
NOTICE: To avoid damage to the battery connector, you must firmly support the connector while
installing or removing a battery.
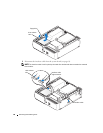
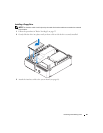
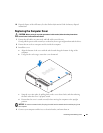
6
Hold the battery with the "+" facing up, and press the battery straight down into the
connector until it snaps into place.
7
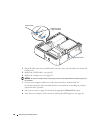
Replace the computer cover (see page 93).
NOTICE: To connect a network cable, first plug the cable into the network device and then plug it into
the computer.
8
Connect your computer and devices to electrical outlets, and turn them on.
9
Enter system setup (see page 99) and restore the settings you recorded in step 1.
battery (positive side)
battery
release
lever