


2. Remove the computer cover (see Removing the Computer Cover).
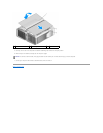
3. Remove any full-length expansion cards (see Removing PCI and PCI Express Cards).
4. Remove the processor airflow shroud (see Removing the Liquid Cooling Assembly).
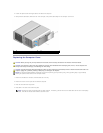
5. Disconnect the front fan and the card fan from the system board.
6. Unscrew the two screws that hold the processor and card fan assembly in place and lift it away from the computer.
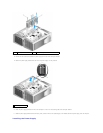
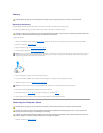
7. Disconnect the control-panel cable from the I/O panel connector by pulling the cable loop.
8. Remove the four mounting screws from the I/O panel.
9. Lift to remove the I/O panel from the computer.
Installing the I/O Panel
1. Follow the procedures in Before You Begin.
2. Remove the computer cover (see Removing the Computer Cover).
3. Align the screw holes on the I/O panel with the screw holes on the chassis, and then tighten the four mounting screws.
4. Connect the control-panel cable to the I/O panel connector.
5. Replace the processor and card fan assembly.
6. Connect the front fan and the card fan to the system board.
7. Replace the liquid cooling assembly (see Installing the Liquid Cooling Assembly).
8. Replace any full-length expansion cards (see Installing PCI and PCI Express Cards) that were uninstalled during removal of the I/O panel.
9. Replace the computer cover (see Replacing the Computer Cover).
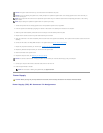
NOTICE: Carefully note the routing of each cable before you disconnect it, so that you are sure to re-route cables correctly. An incorrectly routed or a
disconnected cable could lead to computer problems.
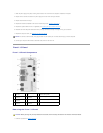
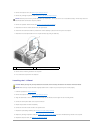
1
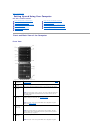
Front I/O panel
2
mounting screws (4)
CAUTION: Before you begin any of the procedures in this section, follow the safety instructions in the Product Information Guide.
NOTICE: Ensure that you replace all cables originally attached to the I/O panel or you computer may not function properly.