22
Printing From Start to Finish
Setting Up Your Print Job
1. When you’re ready to print
your photo, click
Next Step
,
or click the
Print
Assignment
button. You see
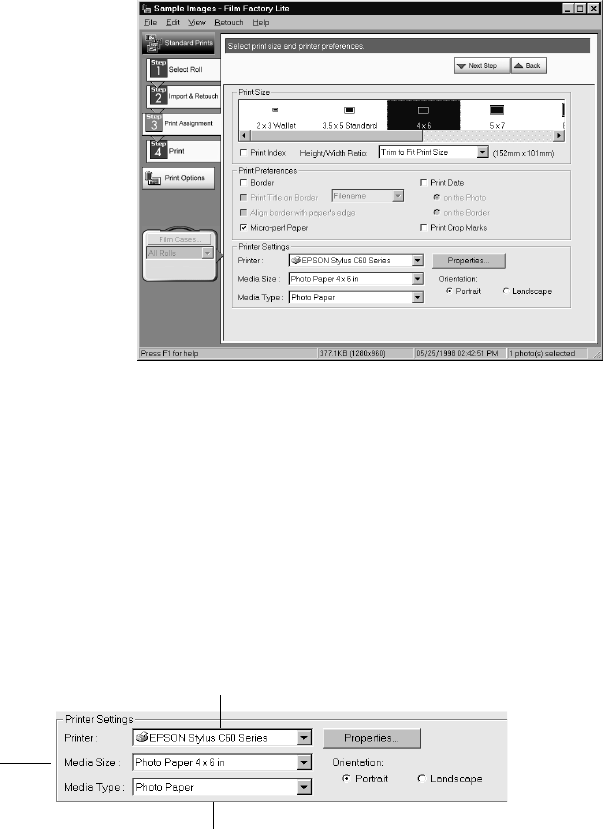
the Print Assignment
window:
2. Select the size photo you
want to print, or click
Fit to
Media Size if you want the
photo to fill the whole page.
3. In the Height/Width Ratio
box, select the ratio of your
photo file, or select
Trim to
Fit Print Size
.
Similar to traditional photo finishing, Film Factory may trim the edges of your
image. This is because your image’s width/height proportions (or aspect ratio)
may not match the proportions of the size you have selected.
4. Select any of the Print Preferences you want. If you’re printing on 4 × 6-inch
Photo Paper with perforations, click
Micro-perf Paper
.
5. Select the right Printer Settings for the paper you’re using. First, make sure
EPSON Stylus C60 Series
is selected.
6. Select the Media Size for the paper you’re using.
If you’re using 4 × 6-inch Photo Paper, select
Photo Paper 4 x 6 in
(if your paper
has perforations) or
Photo Paper 4 x 6 in No Perforations
.
Make sure your printer is selected
Select the size paper
you’re using
Select the type of
paper you’re using
