Scanning with Mac OS X 10.6/10.7 15
Scanning with Mac OS X 10.6/10.7
You can scan original documents and photos and save them as files on your computer.
1. Open an image editing application such as Image Capture, select your EPSON
product if necessary, then click the
Scan button to preview your image.
2. If you would like to select scan settings, such as Color Restoration and file save
settings, click
Show Details.
3. Click the
Scan button to begin scanning. Your image is saved to the folder selected in
the
Scan To pop-up menu.
Note: With Mac OS X 10.6 or 10.7, in addition to scanning with Image Capture, you
can download and install EPSON Scan scanning software. EPSON Scan provides
additional image adjustment and photo correction features for enhancing scanned
images, and provides an interface for TWAIN-compliant OCR scanning software, such
as ABBYY
®
FineReader
®
. To download EPSON Scan, visit Epson’s driver download site
epson.com/support (U.S.) or epson.ca/support (Canada).
Restoring and Correcting Photos
You can automatically transform a faded, dusty, or badly exposed color photo into one
with true-to-life color and sharpness as you scan. Use the
Color Restoration and Dust
Removal
options in EPSON Scan’s Full Auto Mode. In Home and Professional Mode,
you can also select
Backlight Correction to remove shadows from images with too much
background light.
Note: For more information, see the online User’s Guide. You can also click Help on
the EPSON Scan screen for information about all the available settings.
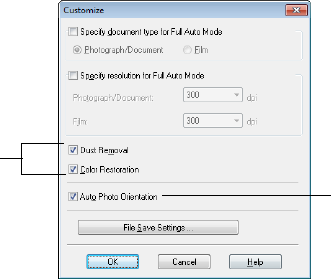
Full Auto Mode
Click the Customize button,
click Dust Removal and/or
Color Restoration, click
OK, and click Scan.
Automatically orients
your photos based
on detected faces
and other features.
If your photo is not
oriented correctly,
turn off Auto Photo
Orientation and try
again.


