


Extender Series • Installation
Installation, cont’d
2-8
PRELIMINARY
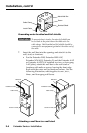
Other adapter plates must be ordered separately. They also
must be attached to the faceplate and cabled before the line
driver is installed in the wall or furniture. The screws needed
for installing the adapter plates are built into the plates, so no
additional screws are needed.
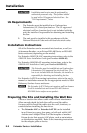
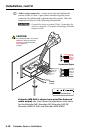
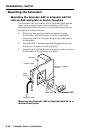
1. Remove the blank plates from the Extender by unscrewing
the nuts that fasten the plates to the faceplate.
2. Insert the adapter
plate screws
through the holes
in the faceplate.
Attach the adapter
plates to the
faceplate with the
provided captive
washers and #4-40
nuts.
3. Attach the output
cables to the rear
connectors of the
adapter plates. Soldering is required for some connectors.
Attach foil and braided shields to ground connections.
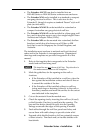
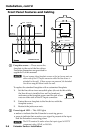
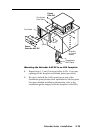
f
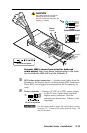
Opening for Mini Architectural Adapter Plates (MAAPs) —
The Extender AKM MAAP can have up to three optional MAAP
adapter plates attached here at one time to allow for a variety of
types of audio/video connectors or another device to be added
to the faceplate.
One double-size and one single-size blank plate are included
with the Extender AKM MAAP to cover unused spaces. Other
adapter plates must be ordered separately. They also must be
attached to the faceplate and cabled before the line driver is
installed in the wall, oor box, or furniture. The screws needed
for installing the adapter plates are included with the MAAPs,
so no additional screws are
needed.
Refer to the picture at right and
the following steps.
1. Insert the MAAP into the
Extender AKM MAAP’s
faceplate opening.
2. Using an Allen wrench,
secure the MAAP to the
faceplate with the provided
machine screws.
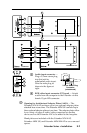
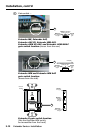
EXTENDER WM AAP
COMPUTER IN
AUDIO IN
#4-40 Nut with
Captive Washer
Extender WM AAP
(up to 4 plates)
Adapter Plate
Extron
Extender AKM MAAP
Line Driver
EXTENDER AKM
MAAP
COMPUTER IN
AUDIO IN
#4 - 40 Screws