


Operation, cont’d
MAV 44 / 48 / 84 / 88 Matrix Switchers • Operation3-6
1
0
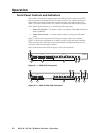
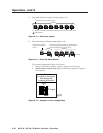
Down ( ) button and LED — The button decreases the audio gain for a
selected input. Press and release the button to decrease the gain by 1 dB or
press and hold the button to decrease the gain by 3 dB per second until the
button is released or the lower limit is reached.
On 4-output switchers, this button and LED stand alone.
On 8-output switchers, this button and LED are secondary functions of the
Output 7 button and LED.
The
LED flashes once in Audio Setup mode to indicate each 1 dB decrease in
the input audio gain. See “Adjusting input audio gain and attenuation” on
page 3-19.
The
LED lights steadily in Audio Setup mode to indicate that the
adjustment has reached the maximum attenuation (-18 dB).
1
1
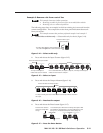
Up ( ) button and LED — The button increases the gain for a selected
input. Press and release the button to increase the audio level by 1 dB or press
and hold the button to increase the audio level by 3 dB per second until the
button is released or the upper limit is reached.
On 4-output switchers, this button and LED stand alone.
On 8-output switchers, this button and LED are secondary functions of the
Output 8 button and LED.
The
LED flashes once in Audio Setup mode to indicate each 1 dB increase in
the input audio gain. See “Adjusting input audio gain and attenuation” on
page 3-19.
The
LED lights steadily in Audio Setup mode to indicate that the
adjustment has reached the maximum gain (+10 dB).
Operations
The following paragraphs detail the power-up process and then provide sample
procedures for creating ties, sets of ties, and configurations; changing a
configuration; viewing ties, sets of ties, and configurations; saving a preset;
recalling a preset; viewing and adjusting the audio level, and selecting the front
panel security lockout.
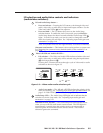
Powering up the switcher
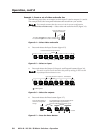
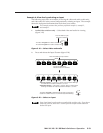
1. Plug in the switcher. On all switcher models, power is automatically applied
when the power cord is connected to an AC source. When AC power is
applied, the switcher performs a self-test and initialization that blinks the
front panel LEDs on and off from left to right. A successful power up self-test
and initialization leaves the power LED on, the Video and Audio LEDs on
(audio/video models only), and all other LEDs off.
The current configuration, all presets, and all input audio levels are saved in
non-volatile memory within 5 seconds of a change or exiting Audio Setup
mode. When power is applied, the most recent configuration is retrieved.
The previous presets remain intact.
Wait at least 5 seconds after changing any configuration, saving a preset, or
exiting Audio Setup mode. Before 5 seconds have elapsed, changes that you
have made may not have been saved.
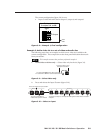
If an error occurs during the self-test, the switcher locks up and does not
operate. If your switcher locks up on power-up, call the Extron S
3
Sales &
Technical Support Hotline.