


Quick Start — MAV Series AV Matrix Switchers, cont’d
MAV 44 / 48 / 84 / 88 Matrix Switchers • Quick StartQS-2
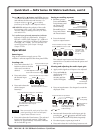
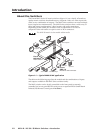
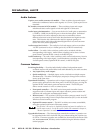
I/O
AUD
VID
Press the button to cycl
e
through the selections
.
The LEDs light when video
and/or audio is selected.
6
5
4
INPUTS
Press and release the Input 5 butto
n.
The Input 5 LED lights to
indicate that input 5 is selected.
A
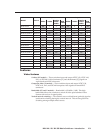
UDIO SETUP AUDIO SETUP
The LED light
s.
Release the butto
n.
2 seconds
Press and hold the button.
Down ( ) and Up ( ) buttons and LEDs decrease
or increase the audio level for the selected input
and indicate the decrease and increase. On
8-output switchers,
and are secondary
functions of the Output 7 and Output 8 buttons.
+dB/–dB LEDs indicate the polarity of the audio
level setting (+dB = gain, –dB = attenuation).
+dB and –dB are secondary functions of the Video
and Audio LEDs.
Each audio input gain and attenuation indicator
indicates a range of 6 dB when lit. (Output 1
LED off = 0 dB to 5 dB, Output 1 lit = 6 dB to 11
dB, Output 1 and 2 lit = 12 dB to 17 dB, Output
1 through 3 lit = 18 dB.) The level indicators are
secondary functions of the Output 1 through
Output 3 LEDs.
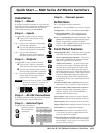
Operation
Powering on
Plug in the switcher to apply power. The
switcher’s self-test sequences the front panel LEDs.
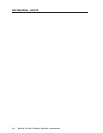
Creating a tie
1. Press and release the I/O
button to select or deselect
video and/or audio as
desired.
2. Press and release
the desired input
button*.
3. Press and release the
desired output
button(s)*.
*You can cancel the entire set of ties at this
point by waiting for the 5-second input/
output button timeout to occur.
4. Press and release the Enter button. The selected
input’s and the selected outputs’ LEDs light
steadily for approximately 1 second to indicate
the tie and then go out.
Saving or recalling a preset
1. To Save a preset:
Press and hold the
Preset button until
the Preset LED
starts blinking.
To recall a preset:
Press and release
the Preset button.
2. Press the desired
input or output button.
The selected input button and Preset button
remain lit for 1 second to indicate the preset and
then go out.
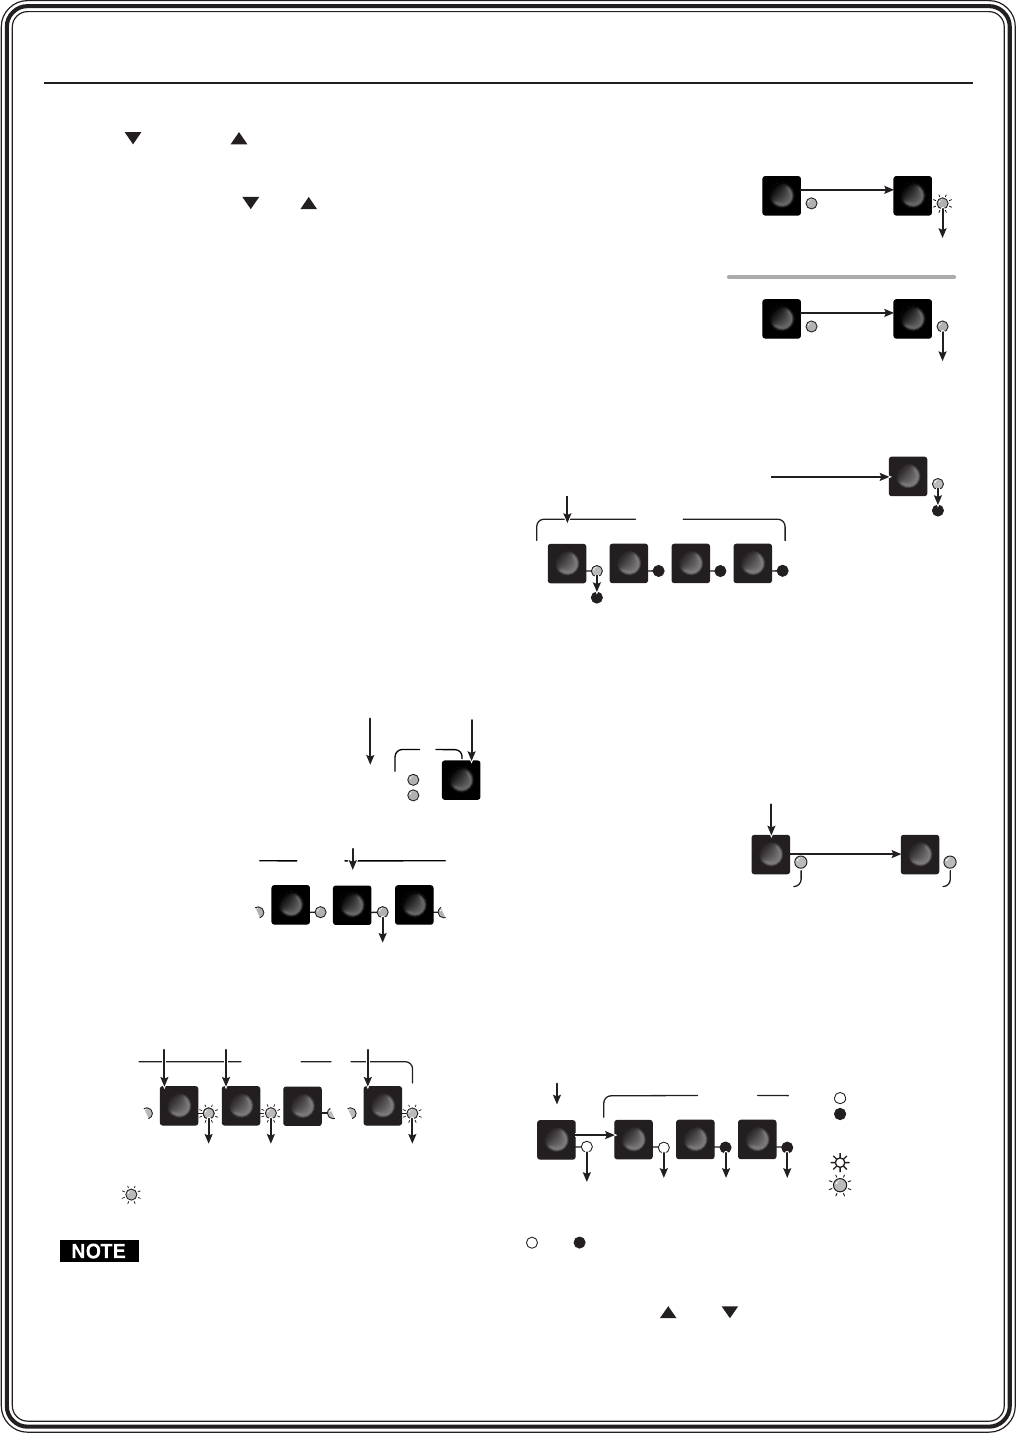
Viewing and adjusting the audio input gain
1. Apply audio signals to all inputs to be adjusted.
2. Press and hold the
Audio Setup (I/O)
button for 2
seconds until the
Audio LED lights.
3. Press an input button. See chapter 3 to read the
displayed value.
4. Increase and decrease the audio input gain by
pressing the
and buttons until the audio
level indicator (Power LED) blinks frequently.
5. For other inputs, repeat steps 3 and 4.
6. Press and release the Audio Setup button to exit.
PRESET PRESET
PRESET PRESET
Save
Recall
Press and hold.
2 seconds
Preset LED blinks.
Release the Preset button.
Press and release.
Preset LED lights.
PRESET
2 4
1
INPUTS
3
P
ress and release the input 1 button
t
o select preset 1 to save or recall.
Preset 2 Preset 3 Preset 4
The Preset LED
and Input 1 LED
light for 1 second
then go out.
2
1
3
OUTPUTS
5
= lit, = unlit
The Output 1 through 3
LEDs display the input's
audio level range.
Press and release an input button.
The input
LED lights.
+dB
-dB
+/–dB LEDs
show polarit
y.
Power blinks to
show the
signal level.
5
4
3 8
OUTPUTS
P
ress and release the Output 3, 4, and 8 button
s.
The LEDs blink to indicate that the selected
input will be tied to these outputs.
= Blinking button