


Operation, cont’d
CrossPoint 450 Plus and MAV Plus Switchers • Operation
3-34
PRELIMINARY
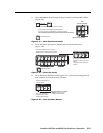
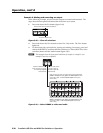
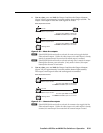
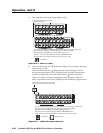
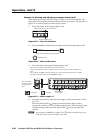
3. Press and release the input 5 button (fi gure 3-56).
17 18 19 20 21 22 23 24
1 2 3 4 5 6 7 8
25
9
I
N
17 18 19 20 21 22 23 24
1 2 3 4 5 6 7 8
25
9
26
10
27
11
O
U
Press and release the Input 5 button.
The button lights green.
The output buttons display the selected input's audio level and polarity (gain or attenuation).
Each output button indicates 0.5 dB when flashing and 1 dB when lit steadily.
When the buttons are lit green, they indicate a gain (+) audio level.
When the output buttons are lit red, they indicate an attenuation (-) level.
In this example, the output buttons display an audio gain level of +8 dB.
Green Green Green Green Green Green Green Green
= Unlit button
Figure 3-56 — Select an input
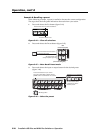
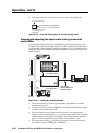
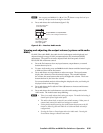
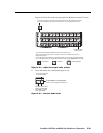
4. Press and release the View (
<
) button once (fi gure 3-57) to decrease the input
audio level by 0.5 dB.
Press and release the View (
<
) button several more times (fi gure 3-57) to
decrease the input audio level by 0.5 dB per push. Note the output button
indication changes that occur each time the View (
<
) button is pressed.
Figure 3-57 shows the result of pressing the View (
<
) button a total of 17
times. Note that the level is now displayed in red to indicate a negative level.
VIEW
17 18 19 20 21 22 23 24
1 2 3 4 5 6 7 8
25
9
26
10
27
11
O
U
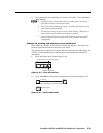
Press the View button to decrease the input
audio level by 0.5 dB per push of the button.
The output buttons display the selected input's audio level and polarity (gain or attenuation).
Each output button indicates 0.5 dB when flashing and 1 dB when lit steadily.
When the buttons are lit green, they indicate a gain (+) audio level.
When the output buttons are lit red, they indicate an attenuation (-) level.
In this example, the output buttons display an audio attenuation level of -0.5 dB.
Red
= Unlit button = Blinking button
Figure 3-57 — Adjust the input audio level