


3-7SW RGB and YUV A Switchers • Operation
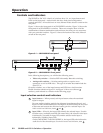
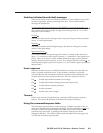
Audio level reset — single input
Reset the audio level for an input to 0 dB as follows:
The switcher must be in normal (manual) mode.
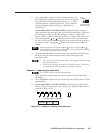
1. Press and release an input button to select an input.
2. Press and hold the Audio Conf/Save button until the Conf/Save LED begins
to blink, then release the Conf/Save button.
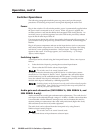
3. Press and release the
and buttons. The and LEDs light and the
Input LEDs go off.
4. Press and hold the Audio Conf/Save button until the Conf/Save LED goes
off. The
and LEDs go off, and the selected Input LED lights.
Audio level reset — all inputs
Reset the audio level to 0 dB for all inputs as follows:
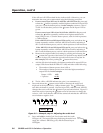
1. Press and hold the Audio Conf/Save button for approximately 10 seconds
until all Input LEDs light for approximately 1 second and then turn off.
Release the Conf/Save button.
2. Press and hold the Audio Conf/Save button again until the Conf/Save LED
turns off to save the reset level in memory and exit the audio display and
adjustment mode.
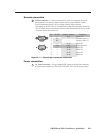
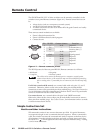
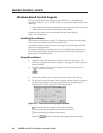
Memory
Audio and switch mode settings are saved in nonvolatile memory. When the
switcher is powered off, the settings are retained. When the switcher is powered
on, the saved memory settings are active. The selected input is not a saved value;
when the switcher is powered on it defaults to input 1.
If the switcher is powered off in autoswitch mode, it automatically switches to
the highest-numbered input with video sync pulses present when it is powered
back on. If no input has video present, all input select LEDs are off.
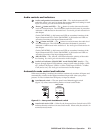
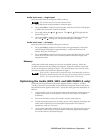
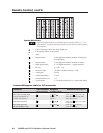
Optimizing the Audio (SW2, SW4, and SW6 RGBHV A only)
Each individual input audio level can be adjusted within a range of –18 dB to
+24 dB, so there are no noticeable volume differences between sources and for the
best headroom and signal-to-noise ratio. Adjust the audio gain and attenuation as
follows:
1. Connect audio sources to all desired inputs and connect the audio outputs to
output devices such as audio players. See Inputs and Output, in chapter 2,
Installation.
2. Power on the audio sources, the switcher, and the audio players.
3. Switch among the inputs (see Switching inputs, in this chapter), listening to the
audio with a critical ear or measuring the output audio level with test
equipment, such as a VU meter.
4. As necessary, adjust the audio level of each input (see Adjusting audio gain and
attenuation (audio switchers), in this chapter) so that the approximate output
level is the same for all selected inputs.