


3-2 User’s Reference Guide
What you need
Locate all items that you need for the installation.
Included in your router package are:
■ The Netopia R9100 Ethernet Router
■ A power adapter and cord with a mini-DIN8 connector
■ Two RJ-45 cables (one for the Ethernet port on your PC; one for the Line port on the router)
■ A dual DB-9 and mini-DIN8 to DB-9 console cable (for a PC or a Macintosh)
■ The Netopia CD containing an Internet browser, Adobe Acrobat Reader for Windows and Macintosh, ZTerm
terminal emulator software and NCSA Telnet for Macintosh, and documentation
You will need:
■ A Windows 95, 98, or NT–based PC or a Macintosh computer with Ethernet connectivity for configuring the
Netopia R9100. This may be built-in Ethernet or an add-on card, with TCP/IP installed and configured. See
“Hardware and operating system requirements” on page 3-1.
■ An Internet modem such as a cable modem or DSL bridge connected to the appropriate wall outlet for your
Internet service source. Your Internet connection device must have a 10 Base-T Ethernet port for
connecting it to the router’s Line port.
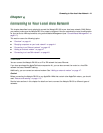
Identify the connectors and attach the cables
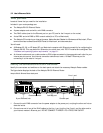
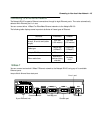
Identify the connectors and switches on the back panel and attach the necessary Netopia Router cables.
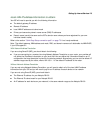
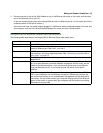
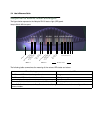
The figure below displays the back of the Netopia R9100 Ethernet Router.
Netopia R9100 Ethernet Router back panel
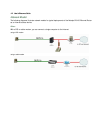
1. Connect the mini-DIN8 connector from the power adapter to the power port, and plug the other end into an
electrical outlet.
2. Connect one end of one of the RJ-45 cables to the Line 1 port (not the Line 2 port), and the other end to
your Internet modem’s Ethernet port. DO NOT CONNECT IT DIRECTLY TO A TELCO LINE OUTLET.
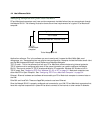
Ethernet
Normal
Auxiliary Console Power
Line 1
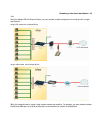
8 port Ethernet hub
Crossover switch
Line 1 port
Auxiliary port
Console port
Power port
8
1
1
Uplink
Line 2