


Easy Setup 7-3
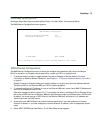
Quick Easy Setup connection path
This section may be all you need to do to configure your Netopia R9100 Ethernet Router to connect to the
Internet.
If your ISP supports DHCP
Your Netopia R9100 Ethernet Router comes preconfigured with the ability to accept an IP address dynamically
assigned by your ISP. To do this, it acts as a Dynamic Host Configuration Protocol client to your ISP's DHCP
server. This means that each time you power the Router on when it is connected to the Internet connection line,
it configures itself with IP address settings without any input on your part. If your ISP supports this method, skip
these instructions and go to Chapter 4, “Connecting to Your Local Area Network.” You don’t need to do anything
else. This is the true Plug-and-Play solution.
If your ISP doesn’t support DHCP
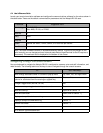
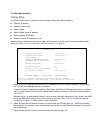
Some ISPs may not be running a DHCP server. In this case, they may simply assign your router a Static IP
Address and will supply you with several values for you to enter into the Router. The ISP will provide the values
shown below:
(You can record these values; print this page and use the spaces above.)
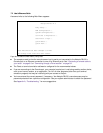
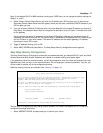
If your ISP assigns your Router a Static IP address, do the following:
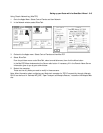
1. From the computer connected to your router, as described in the section “Identify the connectors and
attach the cables” on page 3-2, open a Telnet session to 192.168.1.1 to bring up the Main Menu.
If you don't know how to do this, see “Connecting through a Telnet session” on page 6-2.
Alternatively, you can connect the console cable and open a direct serial console connection, using a
terminal emulator program. See “Connecting a console cable to your router” on page 6-3.
Local WAN IP Address
Local WAN IP Mask
Default IP Gateway
Domain Name
Primary Domain Name Server
Secondary Domain Name Server