


RPM4/HPMS A70M/A20M-AF OPERATION AND MAINTENANCE MANUAL
© 2007 DH Instruments, a Fluke Company Page 114
5.4 RPM4 REPAIR
5.4.1 REMOVING RPM4 FROM HPMS
The RPM4/HPMS is an integrated assembly. The RPM4 should not be removed from the HPMS
unless it is necessary for RPM4 and/or HPMS repairs. The RPM4 should be calibrated in the HPMS
mounting system as the RPM4 orientation may affect its calibration.
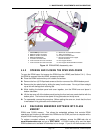
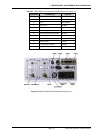
To remove the RPM4 A20M/A70M-AF from the HPMS High Pressure Mounting System,
proceed as follows (numerical references refer to Figure 12):
n Turn the HPMS upside down. Set it on its top on a flat surface.
o Disconnect the J1 ACC. circular connector from the RPM4 rear panel and remove the RPM4
power cable.
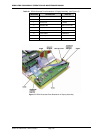
p Remove the Lo Q-RPT connection tube (5): Fully loosen the Lo Q-RPT TEST(+) connection
on the RPM4 rear panel (3). Use a 7/16 in. wrench to loosen the swage nut (3). Do not
remove the NPT thread adapter that is in the Q-RPT TEST(+) port.
Fully loosen the gland nut (6) connecting the Lo Q-RPT connection tube (5) to the Lo Q-RPT
isolation valve rear port (6). Use a 1/2 in. wrench.
Gently pull the Lo Q-RPT connection tube (5) away from the RPM4 rear panel adapter (3)
until the tube tip is free from the adapter in the Lo Q-RPT TEST(+) port.
q Remove the Hi Q-RPT connection tube (9): Fully loosen the Hi Q-RPT TEST(+) connection
on the RPM4 rear panel (2). Use a 7/16 in. wrench to loosen the swage nut (2). Do not
remove the NPT thread adapter that is in the Q-RPT TEST(+) port.
Fully loosen the gland nut (7) connecting the Hi Q-RPT connection tube (9) to the Lo Q-RPT
isolation valve side port (7).
Fully loosen the gland nut (1) connecting the Hi Q-RPT connection tube (9) to the HPMS rear
panel TEST port adapter (1). Use a 5/8 in. wrench.
Carefully pull the Hi Q-RPT connection tube (9) out of the valve side port (7). Then, gently pull
the tube away from the RPM4 rear panel adapter (2) until the tube tip is free from the adapter.
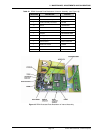
r Remove the four nuts and lock washers (8) that hold the RPM4 rack mount brackets (10) to
the front of the HPMS bracket. Use a 7 mm wrench.
s Loosen but do remove the two nuts and lock washers (13) that hold the RPM4 rear support
bracket (12) to the rear of the HPMS bracket. Use a 7 mm wrench.
Remove the four screws and washers (11) that hold the RPM4 rear support bracket (13) to
the RPM4 rack mount brackets (10). Use a 3 mm allen wrench.
Grasp the RPM4 (4) and rack mount brackets (10) and move them away from the front of the
HPMS bracket and studs (8). The rear support bracket (13) should move away freely
because of the loosened nuts (13) holding it onto the HPMS brackets.
Once the rack mount brackets (10) clear the studs (8), the brackets can be removed from the
RPM4 and the RPM4 can move to the side out of the HPMS. Take care not to drop the
RPM4 when removing the rack mount brackets.
To reassemble, reverse the procedure. When reassembling the high pressure gland and
collar fittings, protect the conical tip from damage and be sure that the collar is fully threaded
on the nipple (left hand thread) before tightening the gland nut. Leak check all connections
after reassembly.