


Foundry FastIron LS Layer 2 Compact Switch Hardware Installation Guide
3 - 6 © 2007 Foundry Networks, Inc. September 2007
Desktop Installation
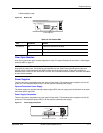
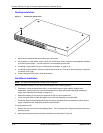
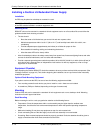
Figure 3.1 Attaching the adhesive feet
1. Attach the four adhesive feet to the bottom of the first switch.
2. Set the device on a flat desktop, table, or shelf near an AC power source. Make sure that adequate ventilation
is provided for the system – a 3-inch clearance is recommended on each side.
3. If installing a single switch only, go to “Powering On the System” on page 3-16.
4. If installing multiple switches, attach the adhesive feet to each one. Place each device squarely on top of the
one below, in any order.
5. If also installing an RPS, place it close to the device.
Rack Mount Installation
NOTE: You need a #2 Phillips-head screwdriver for installation.
Before mounting the switch in a rack, pay particular attention to the following factors:
• Temperature: Since the temperature within a rack assembly may be higher than the ambient room
temperature, check that the rack-environment temperature is within the specified operating temperature
range. (See “Operating Environment” on page 2-2.)
• Mechanical loading: Do not place any equipment on top of a rack-mounted unit.
• Circuit overloading: Be sure that the supply circuit to the rack assembly is not overloaded.
• Grounding: Rack-mounted equipment should be properly grounded. Particular attention should be given to
supply connections other than direct connections to the mains.
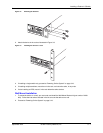
To mount devices in rack:
1. Remove the rack mount kit from the shipping carton. The kit contains two L-shaped mounting brackets and
mounting screws.
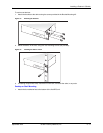
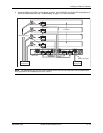
2. Attach the mounting brackets to the sides of the device as illustrated in Figure 3.2.
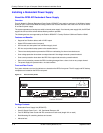
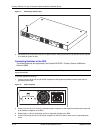
FLS
624
Fastlron LS 624