


38
I
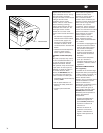
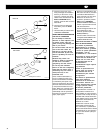
5. Grasp the loose ends of the
web, pull straight and install the
feed tray so the web is on top
of the tray. Replace the safety
shield. Press and hold down the
RUN and REVERSE buttons
together; guide the film out of the
heat rollers.
6. Once the jam has cleared the
heat rollers, press the STOP
button.
7. Thread the film per section FILM
LOADING & THREADING.
SPEED/TEMPERATURE GUIDE AND
THE ART OF LAMINATION
Do not attempt to laminate
abrasive or metal objects such
as staples, paper clips and
glitter, as they may damage the
heat or pull rollers.
Do not force items into the nip
area of the heat rollers. An
item that is not easily drawn
into the laminator by the heat
rollers is probably too thick to
laminate.
Wrinkles may result if an
attempt is made to reposition
an item once it has been
grasped by the heat rollers.
Do not stop the laminator
before an item has completely
exited the pull rollers. Even a
momentary stop will cause a
mark (heat line) on the
laminated item.
Good, consistent lamination is a
result of combining proper heat,
tension and dwell time. Dwell time
is controlled by the speed of the
motor and is defined as the amount
of time the material to be laminated
is compressed between the heat
rollers. When one of the film gauge
buttons is selected the laminator
automatically sets the speed and
temperature for that film and 20 lb.
paper (copier paper).
5. Afferrare le estremità libere del
film, tirare verso di sé, rimontare
il cassetto di alimentazione in
modo che il film vi si trovi sopra.
Abbassare lo schermo di
protezione, premere il pulsante
RUN (AVVIO) e REVERSE
(MARCIA IN SENSO OPPOSTO)
insieme e portare il film fuori dai
rulli di riscaldamento.
6. Quando l’inceppamento nei rulli
di riscaldamento è stato
eliminato, premere il pulsante
STOP (ARRESTO).
7. Introdurre il film come descritto
nel capitolo CARICAMENTO ED
INTRODUZIONE DEL FILM
GUIDA ALLE VELOCITÀ E L’ARTE
DELLA PLASTIFICAZIONE
Non tentare di plastificare
oggetti abrasivi o in metallo
come punti metallici, graffette
o lustrini in quanto potrebbero
danneggiare i rulli di
riscaldamento o i rulli tenditori.
Non forzare gli articoli nell’area
di presa dei rulli tenditori. Un
articolo che non viene tirato
nel laminatore dai rulli di
riscaldamento è
probabilmente troppo spesso
da plastificare.
Cercare di riposizionare un
articolo dopo che questo è
stato afferrato dai rulli di
riscaldamento può causare
corrugamenti.
Non fermare la plastificatrice
prima della completa
fuoriuscita di un articolo dai
rulli tenditori. Persino una
fermata momentanea causerà
un segno (linea di calore)
sull’articolo plastificato.
Una plastificazione costante e di
buona qualità è il risultato di un
giusto equilibrio tra calore tensione
e tempo di sosta. Il tempo di sosta è
controllato dalla velocità del motore
e viene definito come la durata della
compressione del materiale da
plastificare tra i rulli di
riscaldamento. Quando uno dei
pulsanti dello spessore del film
viene selezionato, la plastificatrice
imposta automaticamente la velocità
e la temperatura per quel specifico
film e per carta da 20 lb (carta per
fotocopiatrici).
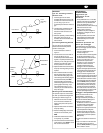
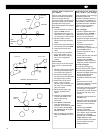
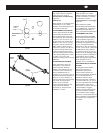
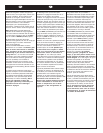
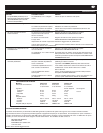
Poly-out
Adhesive
surface
Polyester surface
Poly-in
Adhesive
surface
Polyester surface
POLY-IN
POLY-OUT
Rev.B 04.07.03