


ORCA-IV Image Transfer Laminator Operation Manual
Operation
© GBC Pro-Tech 1998 October
3-13
3RVLWLRQLQJWKH)LOPDQG&HQWHULQJ
WKH:HE
Tools required:
•
1
/
4
" T-handle wrench
• Tape measure
To load film:
1. Retract the shaft locking plungers and remove the
shafts.
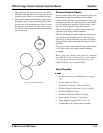
2. Slide the shaft into the new roll of material until the
end plate is tight to the end of the material. Always
leave the end plate on the drive side locked down.
This insures that the material alignment will be the
same from roll to roll. See the material size chart to
determine what end plate setting to use for differ-
ent width materials.
3. Make sure the end plates are tight to the edge of the
material. If the core protrudes out more than 1/8",
it will be necessary to use a plastic spacer to fill the
gap. (Provided in the accessory pack.)
4. Place the roll of material on the machine. Be sure
to line up with the drive tang and slide the shaft
over to engage it into the drive tang. Make sure the
shafts are slid over and engaged. This is critical to
prevent the material from shifting after the
machine is webbed.
5. Repeat steps 1 through 4 for the unwinds and
rewinds.
6. When all the material is loaded on the unwinds and
all the empty cores are loaded on the rewinds, close
the doors and lock in the shafts.
7. Open the doors and verify that the paper edge
matches the edge of the vinyl by measuring from
the side plate to the edge of the rolls. If the paper or
vinyl do not match up, loosen the end plates and
adjust the material so they are exactly in line.
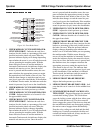
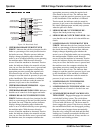
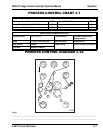
8. Web the vinyl as shown in the diagram and secure
it to the finished product rewind. For best results,
align one edge of the rewind core to match the
material edge measurement on the unwind.
9. Web the transfer paper and tape it to the front
rewind as shown in the diagram. If the paper is
wider than the vinyl, it will be necessary to use the
slitters to cut the paper down to match the width of
the vinyl. See “Setting the Slitter” on page 3-12.
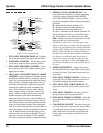
10. Load and web the overlaminate as indicated in the
drawing. The operator has the option of lowering
the pull roll now or waiting for the image to come
through.
11. Check the web force for all the unwinds and
rewinds and adjust as necessary.
12. Lower the main roll and start the motor. Start out at
a low speed (2-3 ft/min (.6-.9 m/min)) and then
increase the speed as needed after confirming that
everything is working well.
13. Check for looseness at either edge of the paper just
before it enters the nip. If a loose edge is detected,
increase the brake 2-5 psi and, if the image is not
yet into the nip, “pop” the roll up and back down
quickly to help pull the web straight.
☞
Note:
Initial looseness on the edge is common, It is caused by
one of several things:
• No tension on the initial web before the roll comes
down.
• Not webbed through perfectly straight.
• Web expansion from the heat as that stays in the
nip area as the machine is webbed.
• The roll does not come down evenly.
14. Close the doors and increase the speed as required.
15. Observe the machine as it runs the material. Pay
close attention to the web. Look for loose webs or
spliced rolls and check the image quality.
IMPORTANT
When the process is complete, stop the machine
and raise the roll. Do not let either paper or vinyl
run through the nip alone. The vinyl could stick
to the roll and the transfer paper would transfer
to the bottom roll resulting in a large clean up
job.