


EN
Storing scanned text or images
57
Storing scanned text or images
Your HP software enables you to quickly store scanned images in a
directory of your choice, saving you time by providing direct access to
your file management system. Store scanned images using the
Document Assistant or the LaserJet Document Desktop. You can
change the properties for this feature within the LaserJet Toolbox.
See “LaserJet Toolbox.”
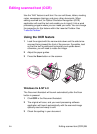
Using the Store feature
1
Load the original with the narrow-side down and the side-to-be-
scanned facing toward the front of the scanner.
2
Adjust the paper guides.
3
Press the
Scan
button on the scanner.
Windows 9x & NT 4.0
The Document Assistant will launch automatically after the Scan
button is pressed.
1
Click
Store
in the Document Assistant.
2
The original will scan, and your word processing software
application will launch automatically with the scanned image
stored on the desktop.
Continued on next page.
3
Change the image if necessary: crop, scale, add annotations, and
etc.
4
Drag the image to the directory of your choice located on the left
side of the LaserJet Document Desktop, or click
File, Move,
and
then select a directory to store the file.
Windows 3.1x
After the Scan button is pressed, the LaserJet Document Desktop will
launch automatically and the original will scan.
1
Change the image if necessary: crop, scale, add annotations, and
etc.
2
Click on the image and drag it to the directory of your choice
located on the left side of the LaserJet Document Desktop, or
click
File, Move,
and then select a directory to store the file.