


basics guide
get started
3
quick start
Printing photos is as easy as 1-2-3! Here’s how you do it.
Caution! You can permanently damage your equipment if you do not
correctly install the print cartridge and insert the memory card. For detailed
instructions, see install or replace the print cartridge on page 14 and insert
a memory card on page 18.
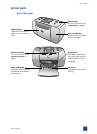
step 1: set up your printer
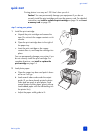
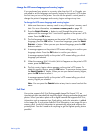
1 Install the print cartridge.
a. Unpack the print cartridge and remove the
tape. Do not touch the copper contacts or ink
nozzles.
b. Open the print cartridge door to the right of
the paper tray.
c. Insert the print cartridge so the copper
contacts face in, and snap the cartridge into
place.
You can permanently damage your printer if you
do not correctly install the print cartridge. For
complete directions, see install or replace the
print cartridge on page 14.
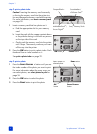
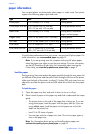
2 Load photo paper.
a. Open the paper tray door and push it down
as far as it will go.
b. Load several index cards under the output
guide. (If you have already printed a photo
index and are ready to print photos, load
several sheets of photo paper, glossy side up.
Load tabbed paper with the tab feeding into
the printer first.)
c. Adjust the paper width guide to fit.