


Configuring for Network Management Applications
Using SNMP Tools To Manage the Switch
If you want to restrict access to one or more specific nodes, you can use the
switch’s IP Authorized Manager feature. (Refer to the Access Security Guide
for your switch.)
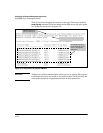
Caution The “public” community exists by default and is used by HP’s network man-
agement applications. Deleting the “public” community disables many net-
work management functions (such as auto-discovery, traffic monitoring,
SNMP trap generation, and threshold setting). If security for network manage-
ment is a concern, it is recommended that you change the write access for the
“public” community to “Restricted”.
Configuring for SNMP Version 3 Access to the Switch
SNMP version 3 (SNMPv3) access requires an IP address and subnet mask
configured on the switch. (See “IP Configuration” on page 8-3.) If you are using
DHCP/Bootp to configure the switch, ensure that the DHCP/Bootp process
provides the IP address. (See
“DHCP/Bootp Operation” on page 8-12.)
Once an IP address has been configured, the main steps for configuring SNMP
version 3 access management features are:
1. Enable SNMPv3 for operation on the switch (Refer to “SNMP Version 3
Commands” on page 13-6).
2. Configure the appropriate SNMP users. (Refer to “SNMP Version 3 Users”
on page 13-8).
3. Configure the appropriate SNMP communities. (Refer to “SNMP Commu-
nities” on page 13-12.)
4. Configure the appropriate trap receivers. (Refer to “SNMP Notification
and Traps” on page 13-18.)
In some networks, authorized IP manager addresses are not used. In this case,
all management stations using the correct User and community name may
access the switch with the View and Access levels that have been set for that
community. If you want to restrict access to one or more specific nodes, you
can use the switch’s IP Authorized Manager feature. (Refer to the Access
Security Guide for your switch.)
13-5