


6. To install the patches, change into each directory using cd. Follow the instructions in the
Readme file.
For more information on how to install the patches, see the README file in each directory.
5.4 Putting the License Key File in the Correct Location
The license key information must already be saved into a file named XC.lic on your laptop.
See “Copying the XC.lic File to Your Laptop” (page 24).
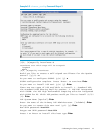
NOTE: The sample XC.lic shown in Example 5-1 is included in this document for illustrative
purposes only; it is not intended for use and is not valid for the system.
Example 5-1 Sample XC.lic File
Hewlett Packard Company -- This message in its entirety may be placed into
your license file. Use an ASCII Text Editor to avoid introducing characters
which will invalidate the license file. If you have any problems installing
this license key, contact the parties listed on the associated license
documentation or web site.
SERVER this_host ANY
VENDOR Compaq
USE_SERVER
INCREMENT XC Compaq 3.1 28-feb-2007 1 23BBAFCE6662c \
1.6 Task 6: Arrange for IP Address Assignments and Host Names 25
NOTICE="Authorization = BM05WHITMORE19772031 - permanent - HP \
XC System Software - BASE License"
INCREMENT XC-PROCESSORS Compaq 3.0 permanent 68 7BA7E0876F0F \
NOTICE="Date 30-Jan-2007 01:29:36 - License Number = \
LAGA4D1958DL - Qty 68 - 434066-B21 - HP XC System Software 1 \
Proc Flex License"
INCREMENT lsf_xc Compaq 6.1 permanent uncounted 8BC06464E38E \
HOSTID=ANY NOTICE="Date 30-Jan-2007 01:29:36 - License Number \
= LAGA4D1958DL - Qty 1 - p/n 5991-4844 - HP XC System Software \
- LSF License"+
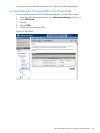
To put the license key file in the correct location, follow these steps:
1. Login as the root user on the head node.
2. Mount that folder. Click on Media in the IRC. Then choose the Folder option.
3. Browse to the location of the license.
4. Copy the contents of the license file from /media/iLO2_FOLDER/ to /opt/hptc/etc/
license/XC.lic
# cp /media/iLO2–FOLDER/* /opt/hptc/etc/license/XC.lic
5. Make sure the file permissions are set to allow only the user root to have read and write
access:
# chmod 600 /opt/hptc/etc/license/XC.lic
# ls -l /opt/hptc/etc/license/XC.lic
-rw------- 1 root root 941 Oct 20 10:34 XC.lic
6. To unmount the folder, click Media on the IRC, then click Unmount the folder.
5.5 Running the discover Command
1. Click (+) for Active OA and choose TCP/IP settings in the left navigation window. Write
down the MAC address of the OA (For example: 00.01.02.03.04.05:06).
2. Select DHCP, then Apply.
30 XC Software Installation