


6 Troubleshooting
6.1 Unable to Manually Set IP Addresses for the iLOs
1. Verify that the iLOs are set to DHCP enabled.
2. Power down the node.
3. Then power it on and watch the monitor as the system boots. Early in the boot process, a
message appears on the screen that says "F8 to configure". Press F8.
4. Follow the configuration menu to find the DHCP setting and disable it.
6.2 Changing External IP Addresses
The netinfo file is only read the first time cluster_config runs. Thus, manually changing
netinfo and rerunning cluster_config does not cause the database to be updated with the
new IP address, because there is already an entry in the database. To get this to work, you can
update the /etc/sysconfig/network-scripts/ifcfg-ethX file; where X is your external
network adapter (probably eth1) with the 16.118.48.57 address. Then perform a service
network restart. This change remains in the file until the next time you run
cluster_config, which then reads in the old values from the database. To permanently change
this value, either run reset_db then rerun cluster_prep and cluster_config, or manually
update the IP address in the database with mysql commands.
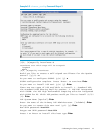
For example:
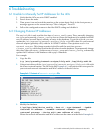
1. Copy the file:
# cp /etc/sysconfig/network-scripts/ifcfg-eth1 /tmp/ifcfg-eth1.bk
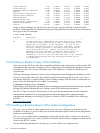
2. Using a text editor, edit the /etc/sysconfig/network-scripts/ifcfg-eth1 file with
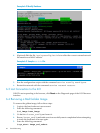
the correct external entries. The file looks like Example 6-1, with entries that correspond to
your external network information and MAC address of the eth1 device.
Example 6-1 Contents of network-scripts File
3. Modify the database:
# /opt/hptc/sbin/device_config --host n1 --type External --ipaddr
<external IP address> --netmask <external netmask> --gateway
<external gateway> --device eth1 <mac address of eth1>
Where the network information and MAC address are the same as in the file in Example 6-1.
6.1 Unable to Manually Set IP Addresses for the iLOs 41