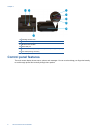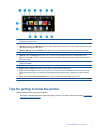
1 Display: The touch screen display shows menus, photos, and messages. You can flick horizontally through photos and
vertically through list menus.
2 Home: Returns to the Home screen (the default screen when you turn on the product.
3 Web Services: Opens the Web Services menu, which displays status details. You can also change settings and, if Web
Services is enabled, print out a report..
4 Wireless Settings: Opens the Wireless menu where you can see wireless properties and change wireless settings.
5 Ink Levels: Opens the Ink Levels menu showing estimated ink levels.
6 Settings: Opens the Settings menu where you can change product settings and perform maintenance functions.
7 Help: From the Help screen, lists the topics for which help is available. From other screens, provides help applicable to
the current screen.
8 Apps: Provide quick and easy way to access and print information from the Apps, such as maps, coupons, coloring
pages, and puzzles.
9 Back: Returns to the previous screen on the display.
10 Photo: Opens the Photo menu where you can view, edit, print, and save your photos.
11 Copy: Opens the Copy menu where you can preview your copy, edit for size and darkness, select black or color, and
select the number of copies. You can also change settings to make 2-sided copies, or select size, quality, and paper
type.
12 Scan: Opens the Choose Scan Destination menu, where you can select a destination for your scan.
13 Fax: Displays a screen where you can send a fax, or choose fax settings.
14 Cancel: Stops the current operation.
Tips for getting to know the printer
Use the following tips to get to know the printer:
• Learn how to manage print apps for printing recipes, coupons, and other content from the web.
Click here to
go online for more information.
Tips for getting to know the printer 7


