


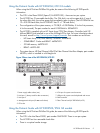
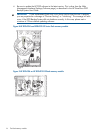
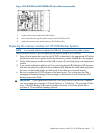
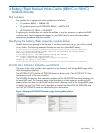


Figure 10 HP D2D2502 and HP D2D2504 G2 Series flash memory module
location of the memory module and USB connector1
screw and bracket securing USB cable connector (not HP D2D4324/4312)2
cable and connector to the motherboard (not HP D2D4324/4312)3
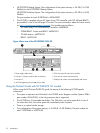
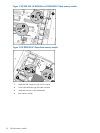
Replacing the memory module, G1 HP D2D Backup Systems
NOTE: It is normally sufficient to replace the USB stick, leaving the existing cable in place.
See the previous section, if you are replacing the memory model in a G2 product.
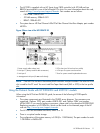
1. Power off and remove the cover from the HP D2D, as described in the appropriate HP ProLiant
Maintenance and Service guide, and locate the memory module (labeled 4 on the diagram).
2. Pull the failed memory module out of the USB connector (1) and simply plug in the replacement
module.
3. If you need to replace the cable as well, first unscrew the bracket (2) holding the USB connector
and then disconnect the cable from the motherboard (3). Replace the whole cable and tighten
the screw on the bracket. Make sure both ends of the cable are connected securely.
4. Be sure to update the HP D2D software to the latest version. This is done from the Web
Management Interface (Settings/Software page), as described in the HP StoreOnce D2D
Backup System User Guide.
IMPORTANT: If your replacement flash stick is at a lower revision than the one it replaces,
you may experience a message of “Devices Starting” or “Initialising". This message will also
occur, if the D2D Backup System did not shutdown correctly. In this case, please wait a
minimum of 12 hours before updating software.
Replacing the memory module, G1 HP D2D Backup Systems 17