


Getting Started with ADSP-BF548 EZ-KIT Lite 1-7
Programming ADSP-BF548 EZ-KIT Lite with VisualDSP++
To spare you from typing in the program, the entire example 1 source
code is included on the VisualDSP++ distribution CD. The source code
and project files can be found in the
<install_path>\Blackfin\Examples\ADSP-BF548 EZ-Kit Lite\Getting
Started Examples\Example_1 subdirectory. The default <install_path>
is C:\Program Files\Analog Devices\VisualDSP 5.0.
Open example 1 by selecting File–>Open–>Project, browsing to the
example’s directory, and selecting the Example_1.dpj project file
1
. Once
the project is opened, view its source code by double-clicking the Sorts.c
label in the Project window (expand the Source Files tree control to see
the label if necessary). Build the project and load the executable program
to the EZ-KIT Lite using the Project–>Build Project command (or use
the F7 hotkey). Once the program is loaded, observe the blue bar on the
first executable statement in the main() function, showing that the pro-
gram is stopped there, awaiting your command to set it running or to
single-step through the source.
To visualize the activities discussed in the exercise, create two plot win-
dows, one for the out_b array and one for the out_m array. To create a plot
window for the out_b array:
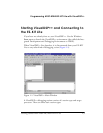
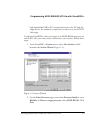
1. Select the View–>Debug Windows–>Plot–>New menu item. The
Plot Configuration dialog box appears.
2. Change Title to
Monitoring out_b.
3. Type
out_b in the Address field.
4. Type 128 (the length of the out_b array) in the Count field.
5. Change Data to
int (the type of our data).
6. Click Add, then click OK.
1
If your PC is used by multiple VisualDSP++ users and/or you do not have write privileges in the
installation directory, copy the entire Getting Started Examples folder to a location you can use with-
out influencing other users.