


HP Omnibook XT6050, XT/VT6200 Removal and Replacement 2-33
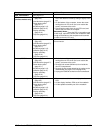
Component Removal Procedure Additional Steps
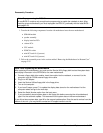
PCA, motherboard
See page 2-23.
PCA, rear antenna
(wireless models only)
Plug-in module
(page 2-5).
Hard disk drive (page 2-7).
Power button panel
(page 2-11).
Keyboard (page 2-13).
Heatsink (page 2-15).
Display assembly
(page 2-19).
Top case (page 2-21).
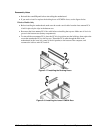
1. Remove the retaining screw from the rear antenna
PCA, and detach the PCA by sliding it slightly to the
left.
2. On the bottom of the computer, loosen the screw
holding the mini-PCI cover (the cover retains the
screw), and remove the cover.
3. Disconnect the cable from the mini-PCI card, and
remove the PCA from the computer.
Reassembly Notes:
Place the PCA in its position near
the left hinge, replace the screw, then thread the cable
through to the bottom of the computer and reconnect
the cable to the mini-PCI card.
PCA, volume
Plug-in module
(page 2-5).
Hard disk drive (page 2-7).
Power button panel
(page 2-11).
Keyboard (page 2-13).
Heatsink (page 2-15).
Display assembly
(page 2-19).
Top case (page 2-21).
Remove the screw from the PCA, and carefully lift it off
of its connector.
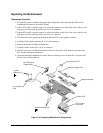
Socket, PCMCIA
Plug-in module
(page 2-5).
Hard disk drive (page 2-7).
Power button panel
(page 2-11).
Keyboard (page 2-13).
Heatsink (page 2-15).
Display assembly
(page 2-19).
Top case (page 2-21).
1. On the bottom of the computer, loosen the screw
holding the mini-PCI cover (the cover retains the
screw), and remove the cover.
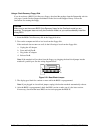
2. Remove both screws (M2x4mm) from inside the
mini-PCI compartment.
3. Remove the two screws attaching the socket to the
motherboard (see Figure 2-16 on page 2-24).
4. Unplug the PCMCIA socket from the motherboard.
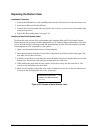
Speaker assembly
Plug-in module
(page 2-5).
Hard disk drive (page 2-7).
Power button panel
(page 2-11).
Keyboard (page 2-13).
Heatsink (page 2-15).
Display assembly
(page 2-19).
Top case (page 2-21).
1. Disconnect the cable from the display interface
PCA.
2. Lift the display interface PCA out of the notebook.
3. Lift the speaker assembly out of the notebook.