6. Insert the IBM Data Migration User’s Guide and Software CD into the
CD-ROM drive if it is not already inserted. If the CD browser window
opens after you insert the CD, close that window.
7. Click Have Disk.
8. In the Copy manufacturer’s files from field, type e:\Drivers\Intel\w9x,
where e represents the drive letter of the CD-ROM drive.
9. Follow the instructions to install the device drivers. When the adapter is
added, it appears in the Network adapters list.
10. Click OK in the Select Device window.
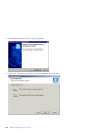
11. When the Update Wizard displays the message that the device driver has
been found, click Next.
12. Click Finish.
13. Restart your computer when prompted.
14. Proceed to “Connecting the computers” on page 1-11.
Windows 98
Follow this procedure to install the Ethernet device drivers in Windows 98:
1. After you install the Ethernet adapter in the computer, start the computer.
The New Hardware Found window opens.
Note: If this window does not open and Windows 98 starts normally, you
might need to manually add the device drivers using instructions in
″Manually adding the Ethernet adapter device drivers with Windows
98″ on page 1-7.
2. When prompted, insert the IBM Data Migration User’s Guide and Software
CD into the CD-ROM drive if it is not already inserted. If the CD browser
window opens, close that window.
3. Type the path e:\Drivers\Intel\w9xto the device drivers, where e
represents the drive letter of the CD-ROM drive, and click OK.
4. Restart the computer when prompted.
5. Proceed to “Connecting the computers” on page 1-11.
If the Add New Hardware Wizard window does not open in step 1 of the
previous procedure, check the Device Manager list to see if the new adapter is
present. If it is not, follow these instructions to manually add the adapter:
Manually adding the Ethernet adapter device drivers with Windows 98:
1. Click Start -> Settings -> Control Panel.
2. From the Control Panel, double-click the System icon.
3. Click the Device Manager tab.
4. Double-click Other Devices or Network Adapters in the list area.
Installation and user’s guide 1-7


