


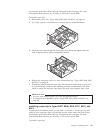
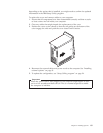

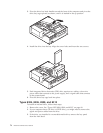


6.
Pull
out
and
lift
up
the
processor
socket
lever
arm
upward
to
its
maximum
vertical
position
to
release
the
processor.
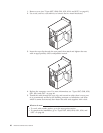
7.
Lift
the
processor
out
of
the
system
board.
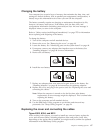
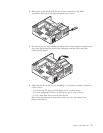
Notes:
a.
When
installing
the
new
processor,
make
sure
to
reinstall
the
fansink
to
insure
proper
cooling.
b.
When
installing
the
same
fansink/processor,
make
sure
to
align
the
fansink
in
the
same
direction
it
was
when
it
was
removed,
as
this
will
ensure
there
are
no
gaps
in
the
thermal
grease.
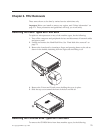
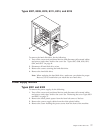
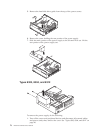
Hard
disk
drive
removal
Types
8303,
8304,
and
8312
This
section
provides
information
and
instructions
for
installing
and
removing
internal
drives.
Internal
drives
are
devices
that
your
computer
uses
to
read
and
store
data.
You
can
add
or
replace
drives
to
your
computer
to
increase
storage
capacity
and
to
enable
your
computer
to
read
other
types
of
media
such
as
CD-ROM.
Internal
drives
are
installed
in
bays.
Within
this
book,
the
bays
are
referred
to
as
bay
1,
bay
2,
and
so
on.
When
you
install
an
internal
drive,
it
is
important
to
note
what
type
and
size
of
drive
that
you
can
install
in
each
bay.
Also,
it
is
important
to
correctly
connect
the
internal
drive
cables
to
the
installed
drive.
Drive
specifications
Notes:
1.
Drives
that
are
greater
than
41.3
mm
(1.6
in.)
high
cannot
be
installed.
2.
Install
removable
media
(tape
or
CD)
drives
in
the
accessible
bay:
bay
2.
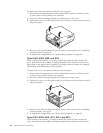
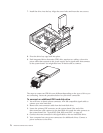
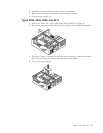
Installing
a
drive
To
install
a
hard
disk
drive,
follow
these
steps.
1.
Remove
the
cover
(see
“Removing
the
cover”
on
page
40).
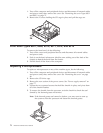
2.
Make
sure
the
drive
is
set
correctly
as
the
master
device.
Refer
to
the
documentation
that
comes
with
your
drive
for
master/slave
jumper
information.
Chapter
6.
FRU
Removals
73