


CHAPTER 5 COMMAND REFERENCE
User's Manual U13502EJ2V0UM00
54
•
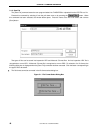
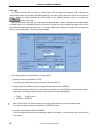
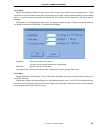
AREA setting range
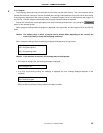
In area mode, set an area range. In this mode, the [Block/Area] button at the right of the TYPE setting screen
becomes active. When this button is clicked, the dialog box below opens. Enter the area range to be used and
click the [OK] button. The area range will be set.
Area: Number of device areas
(automatically set)
Area Number: Selected areas
(set by user)
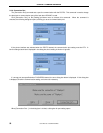
For example, if the area range is specified as 0 to 2 for erasure, Area 0, Area 1, and Area 2 are erased. To
specify only one area, enter the same value as the start area and end area.
Caution To set an area, you must set AREA mode by clicking the CHIP/BLOCK/AREA button in the
FLASHPRO3 window or by executing [set Area].
For information on changing the mode, see Section 5.3.6.
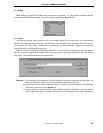
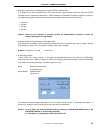
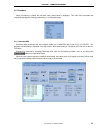
5.2.3 Voltage
[Voltage] sets the voltage at which the target operates. V
DD
and V
PP
voltages differ depending on the device. The
V
DD
and V
PP
voltages are automatically set by loading the parameter file. However, some devices have two supply
voltages, and in this case, the default voltage is automatically set. Change this voltage value, if necessary, depending
on the operating conditions. For information on changing the voltage value, refer to the manual for the device.
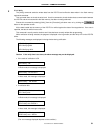
When [Voltage...] is selected from [Setting...] on the menu bar, the dialog box below opens. Enter a voltage and
click the [OK] button. The entered voltage will be set.
Setting range
V
DD
voltage 1.8 to 6.0 V
V
PP
voltage 2.7 to 10.3 V