


8
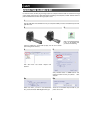
EDITING YOUR PICTURES
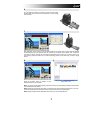
First, click on the picture to select it; then use the ArcSoft tools to edit the pictures as you wish. The Photo
Editing Tools module includes a complete set of photo enhancement, editing and retouching controls. The
windows can be stretched to provide a large size view of the active photo. Double click the module’s tool bar
to maximize the window to fill the computer screen. In addition to the large photo workspace, the Photo
Editing Tools module includes five distinct sets of controls:
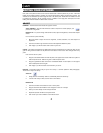
ADJUST
ENHANCE – The Enhance feature includes two types of controls:
AUTO ENHANCE –
Click the “Auto Enhance” button to improve the overall quality of your
pictures with a single click.
MANUAL FIX - For precise image enhancement control, adjust the brightness, contrast and sharpen
sliders.
How to enhance a photo manually:
1. Move the sliders to adjust the level of brightness, contrast, saturation, hue and sharpen for
adjustment.
2. Use the zoom slider to get a closer look at how the adjustment affects the photo.
3. Click “Apply” if you like the result. Click “Cancel” if you do not.
COLOR – This feature is designed to fix digital photos that have unnatural color or appear too dark. It’s also
great for fixing scanned versions of old prints that have faded or whose colors have changed after many
years.
How to fix the color of a photo:
1. Drag the color balance sliders to make the photo color appear more natural. Add red or yellow to
make the photo warmer. Add blue or green to make the photo cooler.
2. Drag the Lighter/Darker slider to the left to reveal details hidden in a dark photo or to the right to
make a faded photo look new again.
3. Click “Apply” if you like the result. Clock “Cancel” if you do not.
RED-EYE – This feature makes it easy for you to fix a red-eye – a common problem in flash photography.
There are two ways to fix red-eye:
AUTO FIX
1. Simply click the “Fix Red-Eye” button to automatically find the fix all red-eye.
2. If not all of the red eye is fixed, use the “Click to Fix” method.
MANUAL FIX
1. Use the zoom slider on the toolbar to zoom in on the photo.
2. Drag the small white box inside the zoom navigator to move over a red eye.
3. Place your cursor directly over the red eye and click.
4. Repeat the process until all the red eyes are fixed.
5. Click “Undo” if you make a mistake or don’t like the result.