


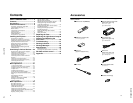
No.51781
1-11
DLA-M2000LU
DLA-M2000LE
12
Controls and Features
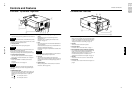
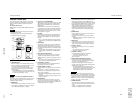
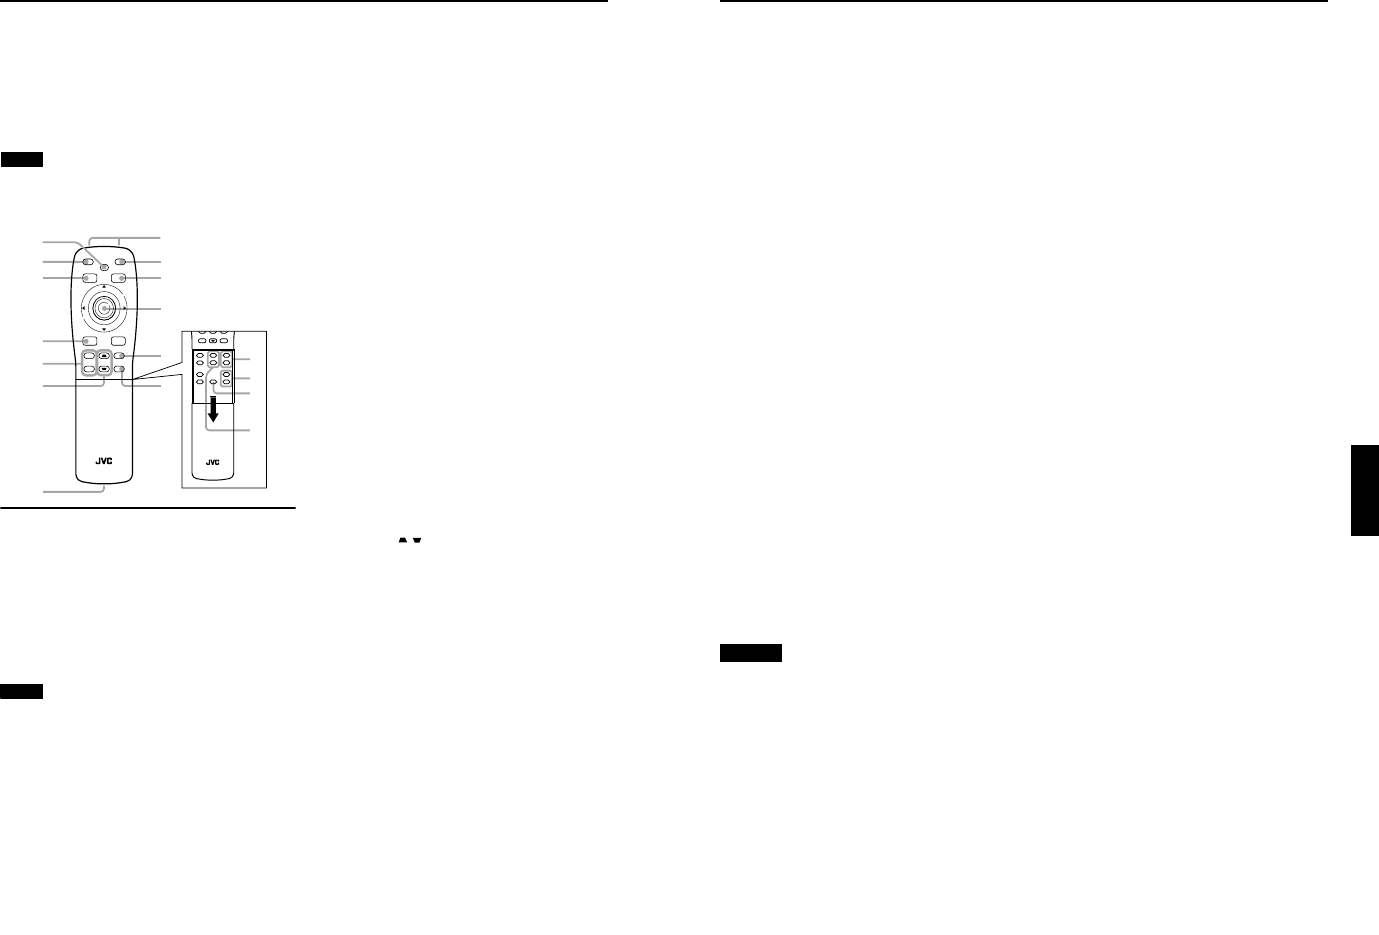
Remote Control Unit
On the remote control, the same buttons as on the control
panel of the projector are provided except for the following
buttons. For the same buttons, operation is the same in
principle.
For remote control only:
DIGITAL ZOOM +/-, QUICK ALIGN., FREEZE, ZOOM T/W,
FOCUS +/-
Notes
• The ZOOM T/W buttons work only if the lens unit with a
zooming function is used.
• The following buttons are not used with this projector.
VIC SELECT, SHIFT U/D, SHUTTER
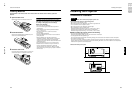
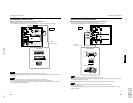
1
Remote control’s signal transmitter
2
OPERATE button
When the projector is in the stand-by mode, press this
button one second or more, and the projector is turned
on, causing the OPERATE indicator to light.
Press it one second or more again, and the projector
goes into the cool-down mode, then stand-by mode.
(Refer to page 31.)
* The OPERATE button will not work for approximately 1
minute from when the light-source lamp is turned on. Use
the button after approximately 1 minute.
Memo
While in the cool-down mode (STAND BY indicator is
blinking):
Even if you press the OPERATE button, the projector is not
turned on. Wait until the projector enters stand-by mode
(STAND BY indicator stays lit).
3
MENU button
Use this button to enter or exit the menu mode. The main
menu appears or disappears at the screen. For details,
refer to “Basic Menu Operation” on page 42.
4
Cursor (
5
/
∞
/
2
/
3
) /ENTER button
When using this as the cursor button, press it in the 5
/
∞
/
2
/
3 directions to select menu items or adjust settings.
When using it as the ENTER button, press the button
straight down.
ENTER is used in the menu mode. Use to display the
hierarchical menus. Also use when “ENTER” is displayed
against the item on the menu screen or when the “All
reset” selection is confirmed. For details, refer to “Basic
Menu Operation” on page 42.
5
PC button
Use this button to select a device connected to the PC 1
or PC 2 terminals. Each time you press the button, the
selection alternates between PC 1 and PC 2. (Refer to
page 32.)
* “PC 1” or “PC 2” will be displayed on the top right of the
projected image. (This function can be disabled using the
menu.)
6
VIDEO button
Use this button to select a device such as a video deck
connected to the AV IN terminal (VIDEO or Y/C input
terminal) of the projector. Each time you press the button,
the selection alternates between Y/C and VIDEO. (Refer
to page 32.)
* “Y/C” or “VIDEO” will be displayed on the top right of the
projected image. (This function can be disabled by the
menu.)
7
Wired remote control terminal
To use the remote control as a wired unit, connect the
supplied remote cable between this terminal and the
REMOTE terminal on the back of the projector. (Refer to
page 20.)
* The remote control’s signal transmitter will stop working
when the cable is connected to this terminal.
8
KEYSTONE / buttons
Use these buttons to correct a trapezoidal distortion of
the projected image. (Refer to page 34.)
9
DIGITAL ZOOM +/– buttons
A part of image can be magnified up to four times on the
screen.
Each time the + or – button is pressed, the image is
enlarged or the enlarged image is reduced by a certain
degree. (Refer to page 36.)
* Images which are enlarged with the digital zoom become
less clear.
* Depending on the video signal source (UXGA, etc.), this
button does not work.
p
ESCAPE button
This button is used in the menu mode to return to the
previous menu. When the main menu is displayed, this
button will cause the menu to disappear. For details, refer
to “Basic Menu Operation” on page 42.
E
N
T
E
R
HIDE
OPERATE
PRESET
ESCAPE
DIGITAL
ZOOM
KEYSTONE
PC
RM-M2000 REMOTE CONTROL UNIT
U
T
+
D
W
–
VIC SELECT
MENU
LENS
RM-M2000 REMOTE CONTROL UNIT
FOCUS
–
+
FREEZE
VIDEO
ZOOM
SHIFT
VOLUME
–
+
QUICK
ALIGN.
SHUTTER
–
+
DIGITAL
ZOOM
KEYSTONE
–
VIDEO
1
3
2
4
5
6
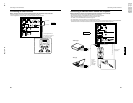
q
p
w
9
8
e
y
r
t
u
7
13
Controls and Features
ENGLISHDEUTSHFRANÇAISITALIANOESPAÑOL
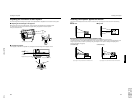
q
PRESET button
This PRESET button only works as a reset button for the
direct button adjustment of the VOLUME button and
KEYSTONE button of the control panel and the VOLUME
button and DIGITAL ZOOM button of the remote control.
When adjusting the volume, keystone or digital zoom
(when the setting is displayed on the screen) the
adjusted value is reset to that which was set when the
projector was shipped from the factory. Of the menu
items, this button only works for the keystone setting
screen.
w
FREEZE button
During projection of an image on the screen, press this
button to obtain a still picture.
To restore normal projection, press it again. (Refer to
page 36.)
* Depending on the video signal source (UXGA, etc.), this
button does not work.
e
HIDE button
Use this button to turn off the image on the screen and
audio sound temporarily. Pressing it again makes the
image and audio sound to resume. (Refer to page 34.)
r
FOCUS +/– buttons
Use these buttons to adjust the focus of the projected
video image.
+: The focus point becomes more distant.
–: The focus point becomes nearer.
t
VOLUME +/– buttons
Use these buttons to adjust the sound volume:
+ : Increase the volume level. (0 → 50)
– : Decrease the volume level. (50 → 0)
(Refer to page 33.)
y
QUICK ALIGN. (Quick Alignment) button
Use this button to automatically align “Brightness”,
“Contrast”, “Horizontal and vertical position”, “Tracking”
and “Phase” for the projected image.
During the automatic alignment, “Quick Alignment”
appears on the screen, and disappears after alignment is
finished. (Refer to page 35.)
* The “Quick Alignment” function only works when the
signal is input from the input terminal of either PC 1 or PC
2. It does not work when the signal is input from the
VIDEO IN terminal (VIDEO or Y/C input terminal).
CAUTION
• Automatic alignment with the quick alignment function
should be carried out on a bright still-picture. This function
may not work correctly on a dark picture or motion-picture.
If adjustment with this function is not satisfactory, adjust
“Brightness”, “Contrast”, “Horizontal and vertical position”,
“Tracking” and “Phase” in the menu mode.
u
ZOOM T/W buttons
Use these buttons to adjust the projected screen size.
(They work only if the lens unit with a zooming function is
used.)
T (Tele): The projected screen size decreases.
W (Wide): The projected screen size increases.