


No.51781
1-25
DLA-M2000LU
DLA-M2000LE
40
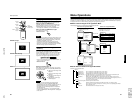
Menu Operations
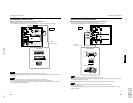
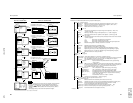
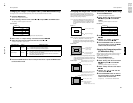
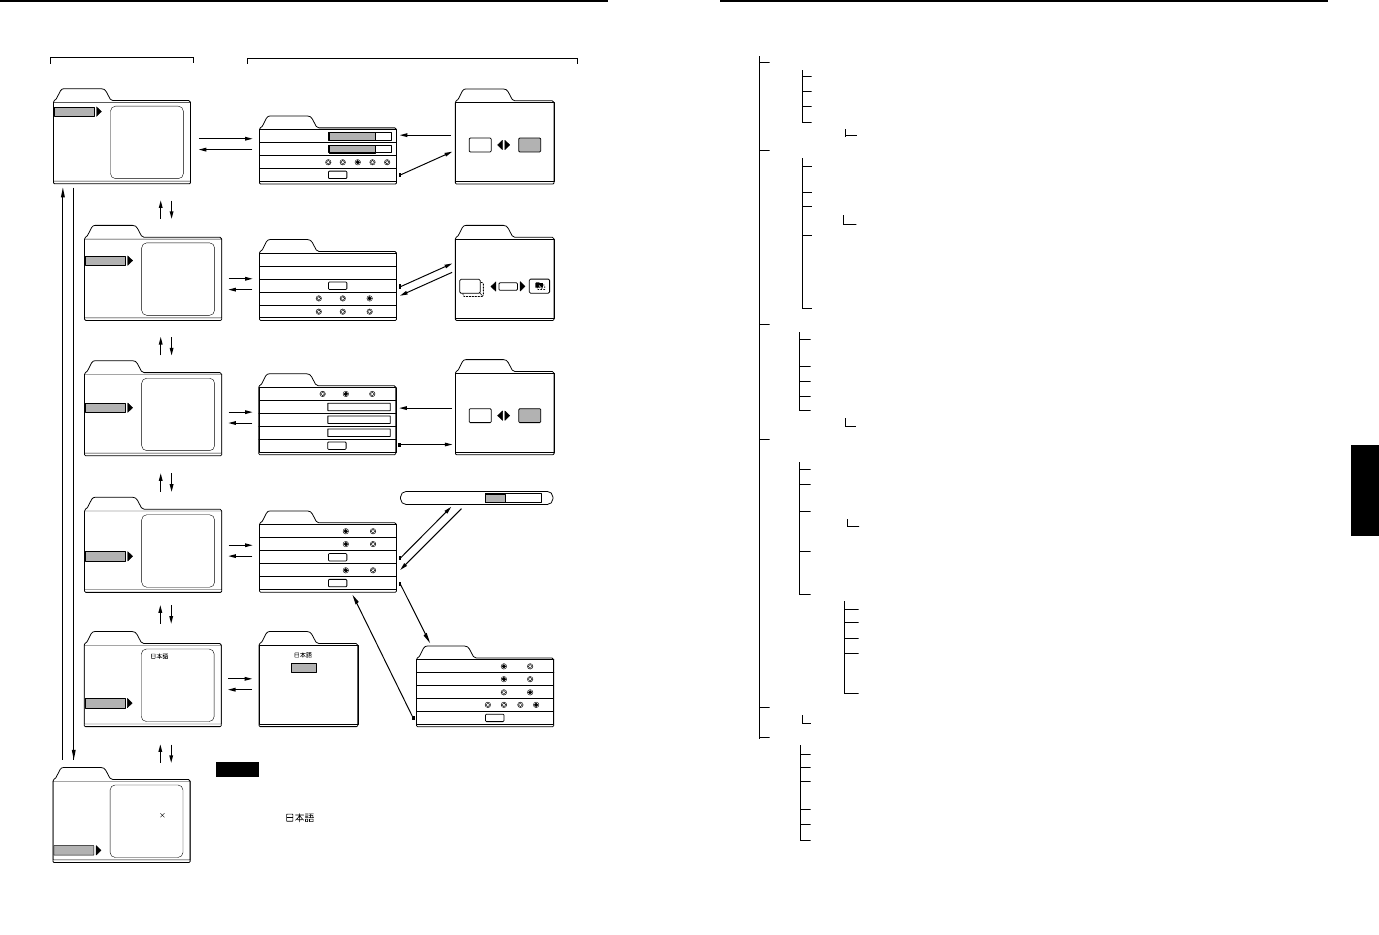
■ Menu Transition Diagram in PC Menu Mode
Menu
Image adj.
Setting
Color temp.
Options
Language
Information
Brightness
Contrast
Sharpness
All reset
Menu
Image adj.
Setting
Color temp.
Options
Language
Information
Tracking
Phase
Position
Resize
Clamp
Menu
Image adj.
Setting
Color temp.
Options
Language
Information
Menu display
Line display
Keystone
PC2 (BNC)
Right Left rev.
Top Bottom inv.
RS-232C
Sleep time
Image adj.
Brightness
Contrast
Sharpness
All reset
12
12
ENTER
1 2 3 4 5
Setting
Tracking
Phase
Position
Resize
Clamp
123
12
ENTER
1:1 Panel Aspect
ST FP BP
Ye s
Image adj.
All reset?
No
ENTER
Position
Disp.Posi. Menu
Options 1
Menu display
Line display
Keystone
PC2 (BNC)
Options 2
RGB
15sec
5sec
ENTER
ON
OFF
YP
BPR
ENTER
Ye s
Color temp.
All reset?
No
Color temp.
Color temp.
R-Gain
G-Gain
B-Gain
All reset
R-Gain
G-Gain
B-Gain
All reset
123
123
123
ENTER
Middle HighLow
Menu
Image adj.
Setting
Color temp.
Options
Language
Information
Menu
Image adj.
Setting
Color temp.
Options
Language
Information
English
Deutsch
EspaÒol
Italiano
FranÁais
Menu
Image adj.
Setting
Color temp.
Options
Language
Information
Input
Switcher
Resolution
Frequency H
Frequency V
Lamp time
PC 1
CH.0
1280 1024
79.9
75
123
kHz
Hz
h
Language
Options 2
Right Left rev.
Top Bottom inv.
RS-232C [bps]
Sleep time [min]
Options 1
OFF
OFF
9600
ENTER
ON
ON
19200
15 30 60 OFF
English
Deutsch
EspaÒol
Italiano
FranÁais
Keystone 0
12,12
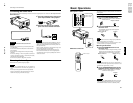
Press 5/∞ to select an item.
Press 2/3 to set or adjust the value.
3 or
ENTER
Press 5/∞ to select an item.
Press 2/3 to select Yes or No.
Then, press ENTER to execute.
Press 5/∞ to select an item.
Press 2/3 to set or adjust the value.
Press ENTER to select an item.
Press 5/∞ / 2/3 to move the
video screen/menu position.
ESCAPE
3
or
ENTER
ESCAPE
Press 5/∞ to select an item.
Press 2/3 to set or adjust the value.
Press
5
/
∞
to select an item.
Press
2
/
3
to set or adjust the value.
ENTER
ESCAPE
ESCAPE
ENTER
3
or
ENTER
ESCAPE
3
or
ENTER
ESCAPE
∞
∞
∞
5
5
5
∞
5
ENTER
ESCAPE
ENTER
ENTER
ESCAPE
ENTER
∞
5
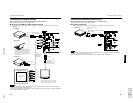
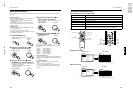
Main menu in Video Menu Mode
Submenus in Video Menu Mode
Press 2/3 to select Yes or No.
Then, press ENTER to execute.
Press 5/∞ to
select an item.
Press 5/∞ to select an item.
Press 2/3 to set or adjust the value.
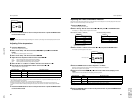
Note
• The display languages of the menus are set to “English” when the projector
is bought. The display language can be selected from the following 6
languages: “ (Japanese)”, “English (English)”, “Deutsch (German)”,
“Espanol (Spanish)”, “Italiano (Italian)” and “Francais (French)”. (Refer to
page 45.)
The language settings in the section are explained in “English”.
You can see the information.
∞
5
41
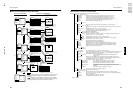
Menu Operations
ENGLISHDEUTSHFRANÇAISITALIANOESPAÑOL
■
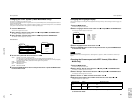
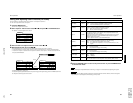
Quick Reference Guide for PC Menu Mode
* : Factory set value.
Main Menu in PC Menu Mode (While receiving computer-related signals)
Image adj. → (Refer to page 47)
Brightness: Brightness of the picture image being projected can be adjusted. (–30 to +30, 0*)
Contrast: Contrast of the picture image being projected can be adjusted. (–30 to +30, 0*)
Sharpness: Adjust the outline of letters etc. (1 / 2 / 3 / 4 / 5, 3*)
All reset: Resets above items to the factory set values.
Yes / No
Setting
Tracking: The lateral size and display area of picture image can be adjusted. (–128 to +127)
→ (Refer to page 46)
Phase: Flickering or dim picture image can be adjusted. (0 to 31) → (Refer to page 46)
Position: Video screen position and menu position can be adjusted. → (Refer to page 49)
Disp. Posi. / Menu
Resize: The relationship between the number of pixels (resolution) and the screen can be selected.
→ (Refer to page 51)
“1:1”: Picture image is projected with its original size.
Panel: Picture image is enlarged to the full size.
Aspect*: Picture image is enlarged while maintaining the original aspect ratio.
Clamp Selectable clamp position. Normally, set to “BP”. ST / FP / BP*
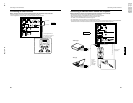
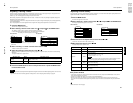
Color temp.
Color temp.
Adjustable color temperature, Low/Middle* /High.
Will be adjusted to correct reddish or blueish image.
R-Gain
Adjusts the red level. (o to 255, the adjustable range varies depending on signals)
G-Gain
Adjusts the green level. (o to 255, the adjustable range varies depending on signals)
B-Gain
Adjusts the blue level. (o to 255, the adjustable range varies depending on signals)
All-reset
Reset above items to the factory set values.
Yes/No
Options → (Refer to page 52)
Options 1
Menu display: 15sec* (Menu disappears in 15 seconds.) / ON (Menu stays on.)
Line display: 5sec* (Line display such as “PC1” or “PC2” appears on top right of the screen for 5 seconds
when the VIDEO or PC button is pressed.) / OFF (Line display does not appear.)
Keystone: Press ENTER to enter the Keystone submenu.
Keystone: Adjust to correct the trapezoidal distortion of the projected image.
(–80 to +128, 0*)
PC2 (BNC): RGB* or YP
B
P
R
. Set to RGB when a computer device with analog RGB, V, H/Cs signals is
connected to the PC2 terminals. Set to YP
B
P
R
when a device with component signals (Y, B-
Y, R-Y) or DTV-format signals (Y, P
B
, P
R
) are connected to the PC2 terminals.
Options 2: Press ENTER to enter the “Option 2” submenu.
Right Left rev.: OFF* / ON (Select for upside-down hanging on the ceiling.)
Top Bottom inv.: OFF* / ON (Select for upside-down hanging on the ceiling.)
RS-232C [bps]: Selectable baud rate (transmission speed). 9600 / 19200*
Sleep time [min:] Selectable sleep times. If no-signal condition continues for the period
of selected time (Unite: Minutes), the projector enters the stand-by
mode. 15 / 30 / 60 / OFF*
Options 1: Press ENTER to return to the “Option 1” submenu.
Language Language for on-screen display. → (Refer to page 45)
Japanese / English* / German / Spanish / Italian / French
Information → (Refer to page 52)
Input: Shows the terminal name selected by the PC button. (PC1or PC2)
Switcher:
This display currently has no meaning. (“CH.0” is usually displayed to indicate that it is not being used.)
Resolution: Shows the resolution of the input signal being received. (Horizontal × Vertical)
It may not be displayed correctly with some input signals.
Frequency H: Shows the horizontal frequency of the input signal being received. ( kHz)
Frequency V: Shows the vertical frequency of the input signal being received. ( Hz)
Lamp time: Accumulated used hours of the light-source lamp.