


No.517811-20
DLA-M2000LU
DLA-M2000LE
30
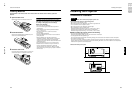
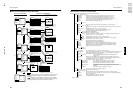
Connecting to Various Devices
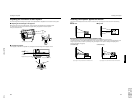
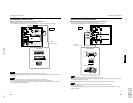
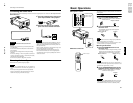
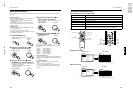
Connecting the Power Cord
After all devices have been finished being connected, connect the supplied power cord. At this time, do not yet turn on the
MAIN POWER switch.
CAUTIONS
To prevent fire and electric shock, observe the
following:
• When you do not use devices, pull out their power cords
from wall outlets.
• Do not connect the devices with power cords other than
those supplied.
• Do not use mains voltage other than the power voltage
indicated.
• Do not scar, damage, or work on the power cords. Also, do
not put a heavy object on, heat, or stretch the power cords,
otherwise they may be damaged.
• Do not insert or pull out the plugs with a wet hand.
1
Insert the supplied power cord into the
power input terminal of the projector.
2
Insert the main plug of the supplied
power cord into a suitable wall outlet.
CAUTIONS
• Do not turn on the projector without installing the lens unit
(optional). Doing so can cause the lens-hole blind cover
(black one) initially installed to be deformed by heart from
the light-source lamp.
• Since the power requirement of the projector is high, insert
the power plug directly into a wall outlet.
• Use the supplied power cord with the ferrite core only.
• Do not remove the ferrite core from the supplied power
cord; Otherwise, there may be a possibility that a harmful
interference occurs.
Removing the Lens Cap
Remove the lens cap before using the projector.
Note
• The lens cap is supplied with the lens unit (optional). It
should be attached to the lens when the projector is not
used.
• Do not operate the projector with the lens cap attached.
Doing so can deform the lens cap because of the heat. A
metallic lens cap can get hot and cause injury.
L
A
M
P
T
E
MP
HI
D
E
PC
VIDE
O
M
E
N
U
KE
Y
S
TONE
VO
L
UME
P
R
E
S
E
T
E
S
C
A
PE
E
N
T
ER
OPE
R
AT
E
Power cord (supplied)
31
ENGLISHDEUTSHFRANÇAISITALIANOESPAÑOL
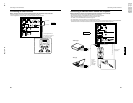
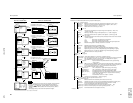
Basic Operations
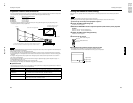
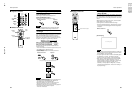
■ Projector’s buttons
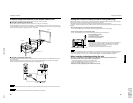
■ Remote control unit
The following describes the basic procedure for normal use
of the projector.
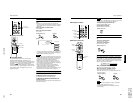
1. Turning on the Power
1
Turn on the MAIN POWER switch.
ON [ ❙
❙❙
❙ ] :The main power turns on and the STAND BY
indicator comes on.
2
Press the OPERATE button for one
second or more.
• The OPERATE indicator lights and the projected
screen slowly appears.
Notes
• After the power is turned on, the image may be jumbled for a
few seconds, but this is not a malfunction.
• After the indicator comes on, it can take a minute or so for
the lamp to warm up and operate consistently.
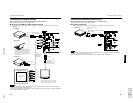
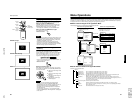
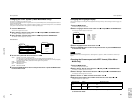
■ Turning off the Power
1
Press the OPERATE button for one
second or more.
• The STAND BY indicator changes to blinking, and the
projector goes into cool-down mode. The cool-down
mode will continue for approximately 120 seconds.
Note
• The OPERATE button will not work for approximately 1
minute from when the light-source lamp is turned on. Use
the button after approximately 1 minute.
2
Turn off the MAIN POWER switch after the
STAND BY indicator changes to steady on.
OFF [‡
‡‡
‡] :The MAIN POWER switch turns off and the
STAND BY indicator goes off.
CAUTION
• Do not turn off the MAIN POWER switch during cool-down
mode (the STAND BY indicator blinking). Turn it off after
the STAND BY indicator becomes on (stand-by mode).
LA
MP
T
E
M
P
H
IDE
PC
V
I
D
E
O
M
E
NU
K
E
Y
S
T
ON
E
VOLU
ME
P
R
E
SET
E
S
C
A
P
E
EN
TER
OP
E
R
A
T
E
LAMP TEMP
STAND BY
HIDE
PC
VIDEO
MENU
KEYSTONE VOLUME
PRESET
ESCAPE ENTER
OPERATE
STAND BY indicator
OPERATE indicator
OPERATE button
U
T
D
W
FOCUS
–
+
ZOOM
SHIFT
VOLUME
–
+
QUICK
ALIGN.
SHUTER
–
+
E
N
T
E
R
HIDE
OPERATE
PRESET
ESCAPE
DIGITAL
ZOOM
KEYSTONE
PC
+
–
VIC SELECT
MENU
FREEZE
VIDEO
RM-M2000 REMOTE CONTROL UNIT
OPERATE button
STAND BY
OPERATE
Projector’s indicator
OPERATE
STAND BY
OPERATE
Remote control unit
Projector
OPERATE
STAND BY
OPERATE
Remote control unit
Projector
(Blinking)
STAND BY
OPERATE
Projector