


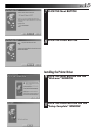


EN 19
1.
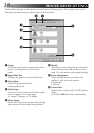
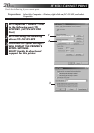
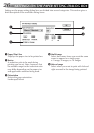
Image quality adjustment (Hue)
Select when you want to change the hue
by adjusting the shade of cyan, magenta
and/or yellow.
1 Cyan adjustment
A blue-green results when the setting is
increased in the cyan direction while
cyan’s complementary color, red, is
intensified when the setting is increased in
the red direction.
2 Magenta adjustment
A reddish-purple results when the setting
is increased in the magenta direction
while magenta’s complementary color,
green, is intensified when the setting is
increased in the green direction.
3 Yellow adjustment
Yellow is intensified when the setting is
increased in the yellow direction while
yellow’s complementary color, blue, is
intensified when the setting is increased in
the blue direction.
• The intensities of each of these colors
can be adjusted using a bar.
With "0" as the default, these values can
be adjusted between –100 to +100.
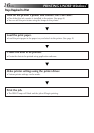
Although it is normally possible to obtain print results of sufficient quality just by setting the
print type and paper size, this section describes how to use the menus to increase print quality
even further.
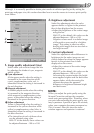
2.
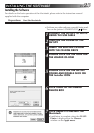
Brightness adjustment
Make this adjustment when the color
appears darker or lighter in the printout
than it does displayed on the screen.
• Adjust the brightness of the entire image
using the bar.
With "0" as the default, this value can be
adjusted between –100 to +100.
Negative values result in a darker image
while positive ones result in a brighter
image. This setting is effective when
dealing with images that are too dark or
too bright overall.
3.
Contrast adjustment
Make this adjustment when differences in
brightness for the entire image are not
clearly defined or when the image appears
fuzzier in the printout than it does
displayed on the screen.
• Adjust the contrast of the entire image
using the bar.
With "0" as the default, this value can be
adjusted between –100 to +100.
Increasing the contrast makes the bright
areas appear brighter and the dark areas
appear darker, while decreasing the
contrast decreases the apparent
difference in brightness between bright
and dark areas.
NOTE:
When you adjust the print quality using the
Manual Correction settings the computer
needs extra processing time. Therefore, when
you print after adjusting the print quality you
may experience a period of up to 90 seconds,
when your computer becomes unresponsive.
This is normal. After this time the status
window appears and opetaion is restored.
1
2
3