


50
CW
AGC AUTO
from another room, or, when coupled with other
commercially available products and where lawful, from
another city via a telephone connection.
The list of applications is large and expanding, and is
limited only by the imagination of software
programmers. In short, the COM connector adds a new
level of flexibility and opportunity to enjoy Amateur radio
when a transceiver control application that supports the
TS-870S and a computer are used.
Before using a computer for transceiver control, you
should be aware of a few points. After you manually
switch OFF the transceiver power, you can then switch
ON the transceiver power using commands from the
computer. Similarly, after switching OFF the power from
the computer, it is then possible to switch ON the power
from the Front Panel.
You can use the Front Panel controls while using
computer control. Settings done from the Front Panel
are effective immediately. After power is switched OFF
from the computer, all values and settings per the Front
Panel controls are restored.
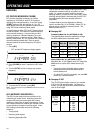
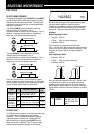
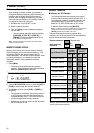
COMMUNICATION PARAMETERS
In order to control the transceiver with your computer,
you must first choose the communication parameters
that you require. Configure your transceiver control
application for 8 data bits and no parity. The
communication speed and number of stop bits must
match the settings in the TS-870S. The transceiver is
configured via Menu No. 56 (COM.RATE). After
changing Menu No. 56, the TS-870S must be switched
OFF and then ON again for the new parameters to
become effective. The defaults in the TS-870S are
9600 bps and 1 stop bit.
Note:
◆
Before connecting the TS-870S to a computer, switch OFF the
power to the TS-870S and the computer.
◆
To reliably use the 38400 or 57600 bps transfer rates, the serial
port of your computer must support these high-speed
communications parameters.
◆
More information on controlling the TS-870S by a computer is
included in Appendix D “COM CONNECTOR PROTOCOL”
{page 83}.
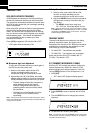
7 OPERATING AIDS
AT-300 EXTERNAL TUNER (OPTIONAL)
Note:
◆
The AT-300 must be connected while the transceiver power is
switched OFF.
◆
There is a 4 A fuse inside the TS-870S for the AT-300 Antenna
Tuner.
1 Press [ANT] to select Antenna 1.
2 Press [THRU/AUTO].
• This places the tuner in the bypass state until
tuning begins in the next step. If tuning fails, the
tuner returns to the bypass state.
• [AT TUNE] is disabled if [THRU/AUTO] is not
pressed.
3 Press [AT TUNE].
• When tuning completes successfully, the
AT TUNE light goes out, and “– AT – TX RX”
lights.
• If tuning doesn’t finish within about 20 sec, an
alarm sounds. You may stop the alarm and the
tuning by pressing [AT TUNE]. The alarm can be
either a triple beep or the Morse code “CHECK”
depending on the Menu No. 37 (WARN. BP)
setting.
•“RX” lights on the Display even if Menu No. 08
(RX AT) is OFF.
• Each time after changing frequency or after
removing then restoring the power, you must
press [AT TUNE] since there is no Preset data
stored when using the external tuner.
COMPUTER [\ TRANSCEIVER
INTERFACE
The TS-870S interfaces easily with a computer.
Computer interfaces on transceivers have encouraged
the development of software applications by many
companies.
Now available are electronic logbook applications that
are partially self-completing. Information transferred
between the transceiver and the computer is written into
the logbook. These applications can automatically track
awards and look up callbook information too.
Imagine using a mouse click to change your TS-870S to
the correct DX frequency and mode of a DX station after
the arrival of a report from your local DX packetcluster.
Efficient operating technique is the key to winning in
pileups and is essential when operating contests.
Other applications can change your computer into an
electronic console from which you can remotely control
functions on the TS-870S without physically touching its
Front Panel. This capability makes possible remote
operation of your transceiver from across the room,
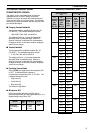
1200
2400
4800
4800
9600
19200
38400
57600
1
1
1
2
1
1
1
1
12 1
24 1
48 1
48 2
96 1
192 1
384 1
576 1
Menu No. 56
Setting
Baud Rate
(bps)
Stop Bits