


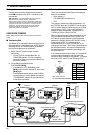

62
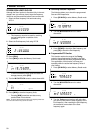
M.CH
USB
AGC AUTO
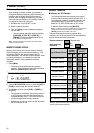
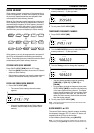
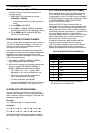
SETTING SCAN SPEED
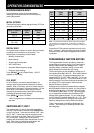
Scan speed can be changed through 9 steps using the
RIT/XIT control. A weight value of the form “Pn”
appears on the Display during Scan. “n” is a number
from 1 to 9 that acts as a speed reference number.
Turning the RIT/XIT control clockwise decreases the
scan speed, and counterclockwise increases the speed.
The Program Scan and Memory Scan speeds can be
independently set as explained below.
The table below shows the time required for one
frequency step (Program Scan) or one memory channel
step (Memory Scan). For Memory Scan, if Menu No. 67
(BSY.STOP) is ON, the weight value is locked at 1.
However, if Menu No. 67 is OFF, the stop time on each
channel is as shown below.
Program Scan:
While scanning, turn the RIT/XIT control to select the
desired weight value.
Memory Scan:
1 Select OFF for Menu No. 67 (BSY.STOP).
2 Press [SCAN] to start the Memory Scan function.
3 Turn the RIT/XIT control to select the desired weight
value.
10 SCAN
MENU No. 67 is OFF
1
n=01
n=02
n=03
n=04
n=05
n=06
n=07
n=08
n=09
8
13
21.3
34.7
56.6
92.2
150.4
245.3
400
0.4
1.8
3.2
4.6
6.0
7.5
9.0
10.5
12.0
Weight Value
(Pn)
Program Scan
(sec/ 10 kHz)
Memory Scan
(sec/ channel)
1
GROUP SCAN
For the purpose of Group Scan, the 100 Conventional
memory channels are divided into 10 groups each
containing 10 channels. The channels are grouped as
follows:
• 00 ~ 09, 10 ~19, 20 ~ 29, . . . . 90 ~ 99
The transceiver only scans memory channels that
belong to the specified group and contain frequency
data.
1 Recall a Conventional memory channel.
2 Switch ON Menu No. 66 (GRP.SCAN).
3 Press Mic [UP] or [DWN] to select any memory
channel belonging to the channel group that you
want to scan.
• Select the correct group before starting to scan;
you cannot change groups while scanning.
4 Adjust the SQL control while no signal is present.
• The squelch must be closed before scanning
starts.
5 Press [SCAN] to start scanning.
6 To stop scanning, press [SCAN], or [CLR],
or [SEND], or Mic [PTT].
MEMORY CHANNEL LOCKOUT
Memory channels that you prefer not to monitor while
scanning can be locked out. Lock out any memory
channel with the following procedure.
1 Press [RX M.CH] to select Memory Recall.
2 Select the memory channel to be locked out.
3 Press [CLR].
• Release [CLR] immediately since pressing it for
more than about 2 seconds erases the contents
of the memory channel.
•A dot lights beside the right-most digit of the
memory channel number to indicate the channel
has been locked out.
•Repeatedly pressing [CLR] adds and removes
the channel from the scan list.