


Configuring for TCP/IP
Part No. 6B4389 June 1999 7-3
Configuring TCP/IP (LPR) Printers on NT Systems
NOTE: You should refer to the documentation and software
provided with your printer for specific installation details.
To configure a printer on a Windows NT workstation/server, first
configure an IP address for both the workstation and the printer.
The following steps describe how to configure TCP/IP on a
Windows NT workstation:
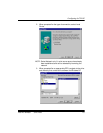
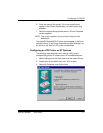
1. Install TCP/IP on your Windows NT 4.0 or Windows 2000
system:
— Click on Start, and select Settings and then Control
Panel.
— Double-click on the Network icon.
— Click on the Protocols tab, and select Add.
— Double-click on TCP/IP protocol.
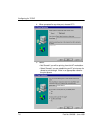
— Insert the requested system disk to copy the required
files.
— Click on the Services tab, and double-click on Microsoft
TCP/IP Printing.
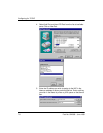
2. Click on the TCP/IP protocol, and add the host’s IP address,
subnet mask, and gateway address.
NOTE: If you are not directly connected to the Internet, assign any
arbitrary Class C address. Use the following example:
aaa.bbb.ccc.ddd where aaa is any number from 192 to
222, bbb and ccc are any number from 0 to 255, and ddd is
any number from 0 to 254. You may also use a subnet
mask of 255.255.255.0 with no gateway address.
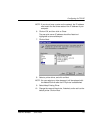
3. If the printer (NIC) does not have a valid IP address, assign
an IP address to the printer using the printer’s front control
panel; or use remote configuration methods. Refer to “Using
Configuration Utilities” for more information.