


Configuring for AppleTalk Networks
8-2 Part No. 6B4389 June 1999
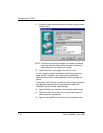
Finding the Printer’s Name in the Chooser
From the Chooser:
1. Select the AdobePS icon.
2. Select the correct zone from the list of AppleTalk zones.
3. Select the name of the printer from the list of printers.
NOTE: The default name for the printer (NIC) is
KOD_xxxxxx_P1_AT. The xxxxx represents the last six
digits of the NIC Ethernet address.
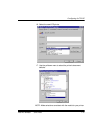
Changing the Printer’s Name
1. Select the printer in the Chooser.
2. Double-click on the LaserWriter Utility.
NOTE: If LaserWriter utilities are not already installed on your
Macintosh, they are available from Apple’s Web site
(www.apple.com).
3. Select Name Printer from the Utilities menu.
The currently-selected printer is listed in the dialog box.
4. Enter a new name for the printer, and click on Rename.
5. Click on OK in the confirmation box.
The new name for the printer should now appear in the list of
printers in the Chooser.
Changing the Printer’s Zone
The printer (NIC) will automatically detect the EtherTalk zone it
resides in and show up (in Chooser) in that zone. It should not be
necessary to define a zone for the NIC unless the particular
subnet that it resides on has multiple logical zones assigned to it.
If your LaserWriter utility supports zone naming, then use it in the
same manner as for Changing the Printer Name. Otherwise, refer
to “Using the Configuration Utilities” for alternate methods.