


. . . . . . . . . . . . . . . . . . . . . . . . . . . . .
9-20 Using KODAK Drivers with Windows Applications — PC
will be saved from one work session to the next for the selected film type
until they are changed.
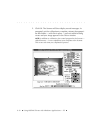
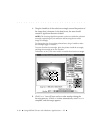
When you move the pointer over the image, the arrow pointer becomes a
cross-hair pointer, and red (R), green (G), and blue (B) values at the location
of the pointer appear near the lower right-hand corner of the image.
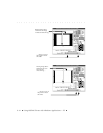
Change Brightness
13. (Optional) Use the scroll bars or type new values (-20 to 20) to adjust
the overall brightness of the image. Click V
IEW CHANGES to see the
result of the new values.
NOTE: If desired, click RESET DEFAULTS to return all balance settings to 0 for the
current film type selected. Otherwise, current settings will be saved from one
work session to the next for the selected film type until they are changed.
Change Contrast
14. (Optional) Use the scroll bars or type new values (-10 to 10) to adjust
the contrast among image elements (pixels). Click V
IEW CHANGES to see
the result of the new values.
NOTES: A contrast adjustment is a gamma adjustment.
If desired, click R
ESET DEFAULTS to return all balance settings to 0 for the current
film type selected. Otherwise, current settings will be saved from one work
session to the next for the selected film type until they are changed.
Choose the Resolution
15. Choose the resolution you want from the RES (resolution) drop down
list box. The F
ULL choice provides the greatest resolution and provides
the largest amount of data from the Scanner; if you want lower
resolution, choose other percentages from this menu.