


. . . . . . . . . . . . . . . . . . . . . . . . . . . . .
9-22 Using KODAK Drivers with Windows Applications — PC
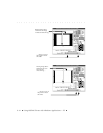
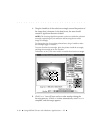
step); if you do not select a specific portion, the entire image will
be scanned. Note that I
MAGE SIZE, shown below the image,
changes to reflect the size of the area you selected.
NOTES: To change the size of an existing selected area, drag a handle to
make the rectangle bigger or smaller.
To move the selection rectangle, place the pointer inside the rectangle,
and drag the rectangle to its new location.
To deselect an area, click once inside or outside the selection rectangle.
Scan the Image
17. Click SCAN. The KODAK Driver window closes and the scan appears
in a window in your software application.
NOTE: If this is the first time that you are completing a scan during this work
session, or if you notice water spots or bubbles in the scanned image at any
time while working with the scanner, clean the scanner “diffuser” ( a
3 x 4-inch piece of white plastic), as summarized in this note, and as fully
described at the end of “Appendix C — Troubleshooting.”
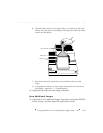
A. Remove the calibration mask and single frame holder adapter or multi-
frame holder.