


. . . . . . . . . . . . . . . . . . . . . . . . . . . . .
5-20 Using the KODAK Driver for Adobe Photoshop (Macintosh)
Change Contrast
14. (Optional) Use the scroll bars or type new values (-10 to 10) to adjust
the contrast among image elements (pixels). Click V
IEW CHANGES to see
the result of the new values.
NOTES: A contrast adjustment is a gamma adjustment.
If desired, click on the R
ESET DEFAULTS button to return all balance settings to 0
for the current film type selected. Otherwise, current settings will be saved
from one work session to the next for the selected film type until they are
changed.
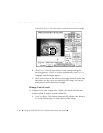
Choose the Resolution
15. Choose the resolution you want from the RES (resolution) popup
menu. The F
ULL choice provides the greatest resolution and provides
the largest amount of data from the Scanner; if you want a lower
resolution, choose other percentages from this menu.
Additionally, you can choose C
USTOM from the RES popup menu and
type a value from 1 to 100 in the text box that appears to the right of
the RES menu.
NOTE: Different resolutions produce different image sizes, as shown in the
IMAGE SIZE information below the image in the KODAK Driver window. Total
scan time will vary with different resolutions, and some resolutions may take
longer to scan on some computers depending on the processor and amount
of memory in the computer.
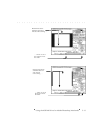
This text box . . .
. . . appears only when Custom is selected.