


Volume and mute keys
To quickly adjust the volume of the sound from your computer, mute the sound entirely, or set the
microphone to mute, press one of the following keys.
Speaker mute (F1)
Speaker volume down (F2)
Speaker volume up (F3)
If you mute the sound and then turn off your computer, the sound will remain muted when you turn on your
computer again. To turn on the sound, press the Speaker volume up or Speaker volume down key.
Microphone mute (F4)
Press the microphone mute key to mute or unmute all of the recording devices.
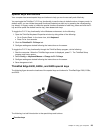
Launching the camera and audio settings for Windows 7 or launching Lenovo Settings for Windows
8 (F5)
• For Windows 7: Press F5 to open the camera and audio settings window. The camera preview is turned
on. Change the camera and audio settings as desired.
• For Windows 8: Press F5 to open the Lenovo Settings program. To use the camera or change the camera
settings, click Camera. To adjust the audio settings, click Audio.
Display management keys
Switching the display output location (F6)
Press this key to switch between the computer display and an external monitor. The following options
will be displayed:
• Computer display only (LCD)
• Computer display and external monitor (same image)
• Computer display and external monitor (the Extend desktop function)
• External monitor only
Note: To switch between the computer display and an external monitor, the Windows+P key combination
also is available.
Display brightness down (F7)
Display brightness up (F8)
You can temporarily change the computer display brightness by pressing the two keys. When you press F7,
the computer display becomes dimmer. When you press F8, the computer display becomes brighter.
To change the default brightness level, go to Control Panel and click Performance and Maintenance
➙ Power Options and make changes as desired.
Wireless radio control key (F9)
Press this key to enable or disable the built-in wireless networking features.
For detailed information on the wireless features, refer to “Wireless connections” on page 35.
24 User Guide