


1. Remove all media from the drives and turn off all attached devices and the server. Then, disconnect all
power cords from electrical outlets and disconnect all cables that are connected to the server.
2. Remove the server cover. See “Removing the server cover” on page 85.
3. Remove the front bezel. See “Removing and reinstalling the front bezel” on page 87.
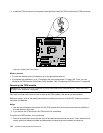
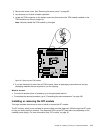
4. Locate the DIT module. See “DIT module” on page 18.
5. Remove the front system fan(s). See “Replacing the front system fan” on page 149.
6. Disconnect the signal cable of the DIT module from the DIT module connector on the system board.
See “System board components” on page 42.
7. If necessary, remove any parts or disconnect any cables that might impede your access to the signal
cable of the DIT module. Note the cable routing and then release the signal cable of the DIT module
from any cable clips or ties in the chassis.
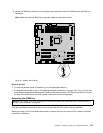
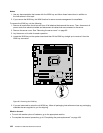
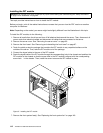
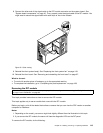
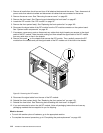
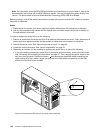
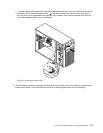
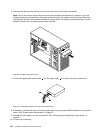
8. Remove the screw 1 on the chassis that secures the DIT module. Then, carefully remove the DIT
module from the chassis and pull the signal cable of the DIT module out of the hole in the chassis.
Figure53. Removing the DIT module
9. Disconnect the signal cable from the rear of the DIT module.
10. Reinstall the front system fan(s). See “Replacing the front system fan” on page 149.
11. Reinstall the front bezel. See “Removing and reinstalling the front bezel” on page 87.
12. If you are instructed to return the old DIT module, follow all packaging instructions and use any
packaging materials that are supplied to you for shipping.
What to do next:
• To work with another piece of hardware, go to the appropriate section.
• To complete the removal procedure, go to “Completing the parts replacement” on page 168
.
114 ThinkServer Hardware Maintenance Manual