


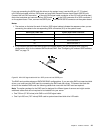


3. Lay the server on its side for easier operation.
4. Locate the Clear CMOS /Recovery jumper on the system board and then move the jumper from the
default normal position (pin 1 and pin 2) to the short-circuited position (pin 2 and pin 3).
5. Wait more than 10 seconds and then move the Clear CMOS /Recovery jumper back to the normal
position (pin 1 and pin 2).
6. Reinstall the server cover and connect the power cord(s). See “Completing the parts replacement” on
page 168.
7. Wait about 30 seconds. Then, turn on the server. The BIOS passwords are erased and the BIOS
recovers to the factory default settings.
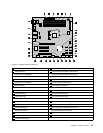
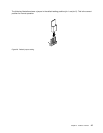
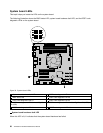
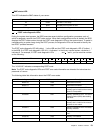
2 BMC setting jumper
When the BMC setting jumper is in the default normal position (pin 1 and pin 2), the server needs about 30
seconds for the BMC to initialize whenever you connect the server to an ac power source. If you press the
power switch on the front panel during this period, the server will not start immediately; it will start after
the BMC initialization nishes.
If you move the BMC setting jumper to pin 2 and pin 3, the server will be directly turned on when you press the
power switch without waiting for the BMC ready. The BMC function might not be available in this situation.
3 BIOS recovery jumper
Set the jumper and boot the server from a BIOS recovery image in order to recover your BIOS settings.
To recover the BIOS, see “Recovering from a BIOS update failure” on page 68
.
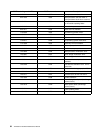
4 Clear password jumper
Used to erase forgotten passwords, such as an administrator password and a user password.
To clear passwords, do the following:
1. Remove all media from the drives and turn off all attached devices and the server. Then, disconnect all
power cords from electrical outlets and disconnect all cables that are connected to the server.
2. Remove the server cover. See “Removing the server cover” on page 85.
3. Lay the server on its side for easier operation.
4. Locate the Clear password jumper on the system board and then move the jumper from the default
normal position (pin 1 and pin 2) to the short-circuited position (pin 2 and pin 3).
5. Wait more than 10 seconds and then move the Clear password jumper back to the normal position
(pin 1 and pin 2).
6. Reinstall the server cover and connect the power cord(s). See “Completing the parts replacement” on
page 168.
7. Wait about 30 seconds. Then, turn on the server. The BIOS passwords are erased, including the
administrator password and user password.
8. To set new passwords, see “Using passwords” on page 65.
5 Manufacturing jumper
Reserved for the manufacturer.
Chapter 3. Product overview 49