


Replacing the front panel board assembly
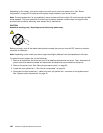
Attention: Do not open your server or attempt any repair before reading and understanding the “Safety information”
on page iii
and “Guidelines” on page 83.
This topic provides instructions on how to replace the front panel board assembly.
Before you begin, print all the related instructions or ensure that you can view the PDF version on another
computer for reference.
Note: Depending on the model, your server might look slightly different from the illustrations in this topic.
To replace the front panel board assembly, do the following:
1. Remove all media from the drives and turn off all attached devices and the server. Then, disconnect all
power cords from electrical outlets and disconnect all cables that are connected to the server.
2. Remove the server cover. See “Removing the server cover” on page 85.
3. Remove the front bezel. See “Removing and reinstalling the front bezel” on page 87.
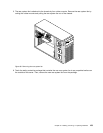
4. Locate the front panel. See “Front panel” on page 17.
5. Remove the front system fan(s). See “Replacing the front system fan” on page 149.
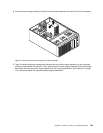
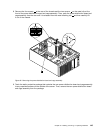
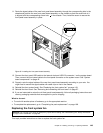
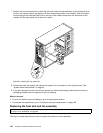
6. Disconnect the signal cables of the front panel board assembly from the internal dual-port USB 2.0
connector 1 and the front panel connector on the system board. See “System board components”
on page 42.
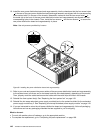
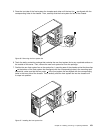
7. If necessary, remove any parts or disconnect any cables that might impede your access to the signal
cables of the front panel board assembly. Note down the cable routing and then release the signal
cables of the front panel board assembly from any cable clips or ties in the chassis.
Chapter 6. Installing, removing, or replacing hardware 147